


Pelco Manual C495M-D (12/96) 7
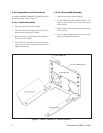
6.0 TAMPER SWITCH INSTALLATION
The HS6000 enclosures come standard from the fac-
tory with a tamper switch(es) mounted on the secured
access door. Refer to Section 6.1 for wiring.
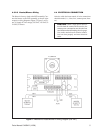
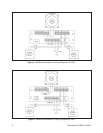
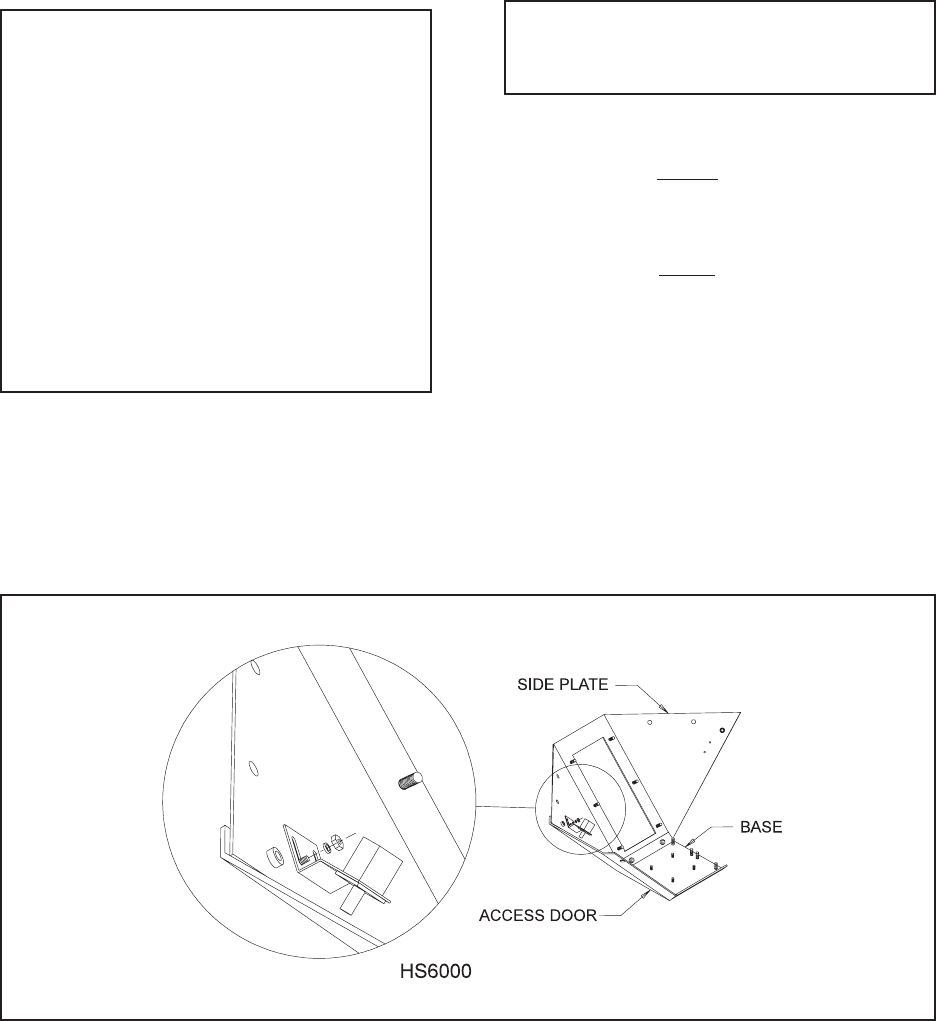
Figure 5. HS6000 Series Tamper Switch Installation
To install a replacement tamper switch, refer to Figure
5 for the correct position of the bracket/switch and per-
form the following steps:
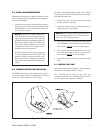
1. Remove the screws securing the access door of the
desired “alarmed” opening.
2. Install the bracket so that the mounting studs go
through the slots in the bracket.
NOTE: The slot in the bracket allows the switch
to be used against either the 1/2” thick lexan win-
dow or the .134” thick metal plate.
3. If the switch is to be used against the metal plate,
slide the bracket so that the studs are at the end of
the slot that is furthest from the switch plunger.
4. If the switch is to be used against the Lexan win-
dow, slide the bracket so that the studs are at the
end of the slot nearest the switch plunger.
5. Secure the bracket/switch with lockwashers and
nuts.
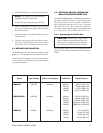
6.1 WIRING THE UNIT
The tamper switch comes with both a “Normally Open”
contact and a “Normally Closed” contact.
For a “Normally Open” circuit, use the “open” and
“common” terminals; for a “Normally Closed” circuit,
use the “closed” and “common” terminals.
5.0 CARE AND MAINTENANCE
Maintenance performed at regularly scheduled inter-
vals will help prolong the operational life and appear-
ance of the equipment.
1. Clean the Lexan window with a mild non-abrasive
detergent in water and a soft cloth regularly to help
maintain picture clarity. For a heavily soiled win-
dow, use vinyl cleaner.
NOTE: Pelco offers a 24-hour, seven-day-a
week Technical Assistance Program (TAP) de-
signed to assist any customer with a technical
problem involving Pelco equipment whether it’s
the weekend or late at night. For technical as-
sistance dial (800) 289-9100 and you will be
connected to a Pelco TAP member who is
trained to answer your questions.
Pelco also guarantees one-day turnaround on
any Pelco equipment sent in for repair. This
includes warranty and non-warranty items.
Refer to the section on “Warranty and Return
Information” in this manual for the proper pro-
cedure.