


C1472M-E (1/07) 11
If the camera will use a different voltage than the enclosure’s heater perform the following steps.
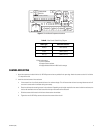
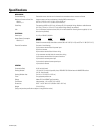
1. Bring in wires for AC high and AC neutral. If you are using 24 VAC, refer to Table A. Connect the wires as follows:
Connect AC high to connector 9 of the 10-connector INPUTS terminal block.
Connect AC neutral to connector 10 of the 10-connector INPUTS terminal block.
2. Connect the leads from the two-pin plug, which is supplied as loose equipment, to the camera as follows:
Brown AC HI
Blue AC NT
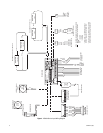
Refer to Figures 1 and 2 and connect the plug to the CAM 2 socket on the circuit board.
FINAL INSTALLATION
1. Adjust the focus and iris on the camera, if necessary.
2. Reassemble the top and bottom enclosure sections.
3. Install and tighten the four tamper-resistant screws in the enclosure cover. Do not over tighten.
4. If the enclosure is installed outdoors and has watertight fittings installed on the bottom of the enclosure, be sure the fittings have been
tightened enough to prevent water from getting inside the enclosure.