


6 C494M-E (9/06)
Installation
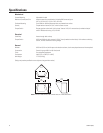
Before installing the HS2000 to a wall, make sure that the mounting surface is able to support four times the full weight of the enclosure,
camera, and lens.
The tilt table and tilt table mounting brackets may be removed to provide adequate clearance for mounting the enclosure.
NOTE:
The four fasteners required to secure the HS2000 to a wall (minimum 3/8” diameter recommended) are not supplied.
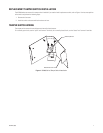
To mount the enclosure to a wall (tight to the ceiling), perform the following steps:
1. Remove the cover from the mounting bracket. A special socket is provided (fits 1/4" square drive).
2. Using the mounting bracket as a template, mark and drill holes in the mounting surface.
3. Attach the enclosure with the required fasteners.
4. Route the required cables through the back or top.
5. Mount the camera/lens to the tilt table.
6. Make all appropriate connections: camera power, video [coax], and lens.
7. Position the camera and tighten the 1/4-20 fasteners to secure the tilt table in place.
8. Replace the cover and secure with the 1/4-20 tamper-resistant screw that is provided.
NOTE:
A plate is provided to prevent access through the top of this enclosure. If needed, it is mounted with the mounting bracket using the
same mounting holes and hardware.
OPTIONAL WINDOW INSTALLATION
The HS2000 is provided with a clear 0.25" (6.35 mm) thick viewing window. An optional smoked window, HS200010019, is available.
Instructions for installing the optional smoked window are as follows:
1. Remove the cover from the mounting bracket. A special socket is provided.
2. Remove the four 1/4-20 elastic locknuts and 1/4" flat washers.
3. Remove the window.
4. Remove the protective coatings from the new window and place the window over the four 1/4-20 studs.
5. Replace the hardware and replace the cover.