


C2944M-G (6/09) 23
MASKING
Masking lets you block certain areas of a camera scene. A maximum of eight masks can be defined.
NOTE: If you add a ninth mask, the camera erases the first mask. You cannot configure more than
eight masks.
MASK: Use this option to enable or disable masking; the default setting is OFF.
MASK COLOR: Use this option to select the color of the mask. Available settings are black, white,
gray, red, green, blue, and yellow. The default setting is BLACK.
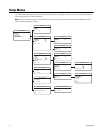
MASK EDIT: Use this option to edit one mask. To edit a mask, complete the following steps:
1. Change the MASK setting on the MASKING menu to ON.
2. Select the MASK EDIT menu. The MASK SETTING menu appears.
3. Use the pointer to configure the mask area.
a. Press the button up, down, left, or right to move the cursor to the upper-left corner of the mask.
b. Press the center of the button to mark the upper-left corner.
c. Press the button up, down, left, or right to move the cursor to the lower-right corner of
the mask. If you move the cursor either left or above the start point, the mask edit is
cancelled.
d. Press the center of the button to mark the lower-right corner. The mask area is blacked out. The MASKING menu appears with the
new mask.
4. Repeat step 3 for each additional mask.
Mask Erase
Select this option to erase one or more masks. The camera erases masks from the last created to the first created. To erase a mask, select MASK
ERASE. The mask that was last created disappears. Repeat to erase additional masks.
TITLE
Select this option to configure the camera title.
TITLE: Use this option to enable or disable the title display; the default setting is OFF.
EDIT TITLE: Use this option to enter or edit the camera title, up to 16 characters. The default
setting is blank.
To enter a camera title, complete the following steps:
1. Change the TITLE setting on the TITLE menu to ON.
2. Select the EDIT TITLE menu. The EDIT TITLE menu appears.
3. Press the button up, down, left, or right to move the cursor to the desired character.
The space character is located below the letter “n.”
4. Press the center of the button to select the character. The selected character appears in the
blank area at the bottom of the screen.
5. To clear a character, select BS (backspace). The camera deletes the last character entered.
6. Repeat steps 3 and 4 until you have entered the camera title.
7. When the title is correct, select BACK to return to the TITLE menu.
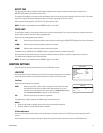
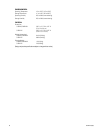
-> OFFTITLE
EDIT TITLE
BACK EXIT
TITLE
-> OFF
-> -2
-> 0
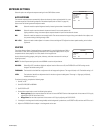
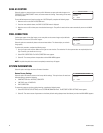
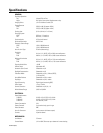
MASK
MASK COLOR
MASK EDIT
MASK ERASE
BACK EXIT
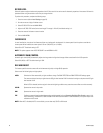
MASKING
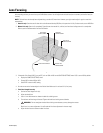
SELECT START POSITION
NOW POINT = ( XXX, XXX )
MASK SETTING
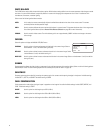
-> OFFTITLE
EDIT TITLE
BACK EXIT
TITLE
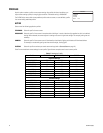
ABCDEFGHIJKLM
NOPQRSTUVWXYZ
abcdefghijklm
nopqrstuvwxyz
123456789-/
BS
RETURN
TITLE EDIT