


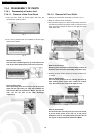
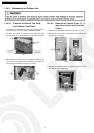
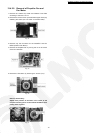
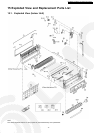

13.4.2.3. Removal of Control Plate Casing
1. Remove the Cabinet Top Plate and Cabinet Front Plate
according to the item 13.5.2.1.
2. Remove the Control Cover (2- / 3-way valve Covers and
Terminal Cover) according to the item 13.5.2.2.
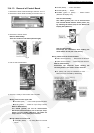
3. Remove the Control Plate Casing by releasing hooks (four:
two each on the right and left).
Fig. 5
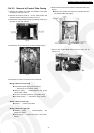
4. Remove the screw (one) fixing the Control Plate Casing.
Fig. 6
5. Disconnect a variety of connectors and Terminals.
Wiring cables from lower side
•
• •
•
Compressor cables (red, blue and yellow)
...... Disconnect the connector (white).
•
• •
•
CN-HOT (white) ...... Electromagnetic Coil (4-way
valve) Cable: Yellow
•
• •
•
Terminals connecting Reactor (two) Cable: Gray
•
• •
•
CN-TANK (white) ...... Compressor Temp. Sensor
Wiring cables from left side
•
• •
•
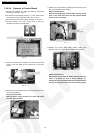
CN-FM1 ...... Outdoor Fan Motor
Wiring cables from right side
•
• •
•
CN-STM (white) ...... Electromagnetic Coil
(Expansion Valve)
•
• •
•
CN-TH (white) ...... Outdoor Air Temp. / Pipe Temp.
Sensor
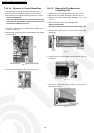
6. Disconnect the interconnect cables and the Earth Wire (one
screw).
•
• •
•
Remove the screws (two) fixing the Terminal part and
the Cabinet Side Plate (right).
Fig. 7
7. Remove the Control Plate Casing from the main unit by
holding it up.
Fig. 8
71
CS-TE9DKE CU-TE9DKE / CS-TE12DKE CU-TE12DKE