


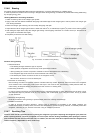


13.4.1.4. Removal of Control Board Box
1. Remove the Front Panel according to the item 15.5.1.1.
2. Remove the Front Grille according to the item 15.5.1.2.
3. Remove the Control Board according to the item 15.5.1.3.
Note for Disassembly:
The Control Board Box can be removed without pulling
out the Board. (Disconnect a variety of connectors and
the Receiver & Display Unit first.)
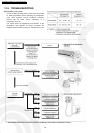
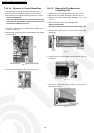
4. Remove a fixing screw for interconnecting cables and a
screw for earth wire.
5. Remove the screws (three) for Terminal Board and release
the hook (one).
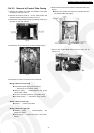
Fig. 12
6. Pull out the Control Board Box from the main unit.
Fig. 13
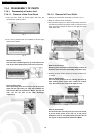
13.4.1.5. Removal of Fan Motor and
Cross-Flow Fan
1. Remove the Front Panel according to the item 13.5.1.1.
2. Remove the Front Grille according to the item 13.5.1.2.
3. Remove the Control Board Box according to the item
13.5.1.4.
4. Remove the Drain Hose and Discharge Grille.
Note for Disassembly:
Be careful of Drain Hose that will be hard to pulled out.
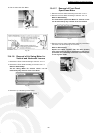
5. Unscrew the Screws (two) on the left side of the Heat
Exchanger.
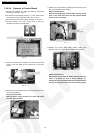
Fig. 14
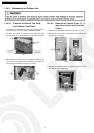
6. Loosen the Screw (one) between the Cross-Flow Fan and
Fan Motor.
Fig. 15
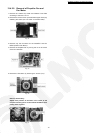
7. Pull out the Cross-Flow Fan by holding up the left side of
the Heat Exchanger.
Fig. 16
68
CS-TE9DKE CU-TE9DKE / CS-TE12DKE CU-TE12DKE