


11
Shooting
Selecting the shooting modes (scene files)
(continued)
When performing the operations using the controller
When the AW-RP655 is connected:
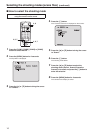
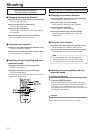
1 Press one of the [1] to [5] buttons of
[CONTROL/PREVIEW MONITOR OUT SEL] to
select the unit which is to be operated.
2 Press the [MENU] button to set the LCD panel
display to the menu mode.
3 Turn the jog dial (main) until CAMERA SETTING
appears, and press the [OK] button.
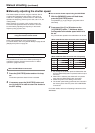
CAMERA SETTING
OK Key
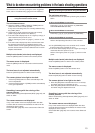
4 When the scene selection menu has appeared
on the LCD panel, select the scene to be set,
and press the [OK] button.
SCENE HALOGEN
OK Key
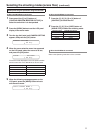
The scene names displayed on the LCD panel correlate
with the scene files of the AW-HE120 as shown below.
AW-RP655 display AW-HE120 scene file
HALOGEN Scene1
FLUORESCENT Scene2
OUTDOOR Scene3
USER Scene4
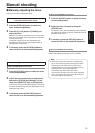
5 When the following message appears on the
LCD panel, press the [MENU] button twice to
exit the menu mode.
OPEN CAMERA MENU ?
OK Key
When the AW-RP555 is connected:
1 Press the [1], [2], [3], [4] or [5] button of
[CONTROL] to select the unit.
2 Press the [1], [2], [3] or [USER] button of
[SCENE FILE] to select the shooting mode.
Shooting mode [SCENE FILE] button
Scene1 [1]
Scene2 [2]
Scene3 [3]
Scene4 [USER]
When the AW-RP50 is connected:
Refer to the Operating Instructions of the controller.