


5
Servicing of Double-Insulated Appliances
A double-insulated appliance is marked with one or more of the
following: The words “Double Insulation” or “Double Insulated” or the
double-insulation symbol ( ). In a double-insulated appliance, two
systems of insulation are provided instead of grounding. No grounding
means is provided on a double-insulated appliance, nor should a means
for grounding be added to the appliance. Servicing a double-insulated
appliance requires extreme care and knowledge of the system and
should be done only by qualified service personnel. Replacement parts
for a double-insulated appliance must be identical to the parts they
replace.
Polarization Instructions:
To reduce the risk of electric shock, the Oreck Steemer model is
equipped with a polarized alternating current line plug (a plug having one
blade wider than the other). This plug will fit into a polarized outlet only
one way. This is a safety feature. If you are unable to fit the plug fully
into an outlet, try reversing the plug. If the plug should still fail to fit,
contact a qualified electrician to replace the obsolete outlet. Do not
defeat the purpose of the polarized plug in any way.
A.L.C.I
The Oreck Steemer is made to double-insulated specifications and is
equipped with an A.L.C.I. (Appliance Leakage Circuit Interrupter). The
A.L.C.I. shuts off the unit in potentially hazardous situations.
fig. 5 The A.L.C.I. has a Test and Reset button which should be
operated each time the unit is plugged in.
a. Do not remove the tag which provides test instructions from
around the cord at the A.L.C.I. (A.L.C.I. may vary from illustration).
DANGER: Improper installation of A.L.C.I. can result in electric shock.
Do not modify or by-pass the A.L.C.I. Do not replace any electrical
component in this product with anything other than an authorized
ORECK replacement part. The risk of electric shock can result if used in
the vicinity of improperly grounded stationary appliances (stove,
refrigerator, washer, etc.).
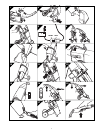
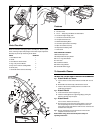
To Set-Up Cleaner
The Oreck Steemer carpet and hard flooring cleaner is designed for
fast and easy set-up.
fig. 6 Swing the wheels away from the nozzle into the operating
position.
Remove the supply/recovery tank:
fig. 7 Pinch the gray and red tank release latch together and gently
lower the latch to the nozzle. Do Not Force Latch!
fig. 8 Push the supply/recovery tank downward toward the nozzle and
lift out.
fig. 9
Fill the supply tank:
a. Open the gray tank cap.
b. Fill the tank with hot tap water to the fill line, as noted on the side
of the tank.
c. Use the temperature label on side of tank to check water
temperature. “OPTIMAL” should be showing on label when the
correct water temperature is achieved.
CAUTION: Do not overfill tank or use water that is too cold
or too hot. Do not put any type of shampoo/cleaner into the
supply tank. Use only Steemer Full Release
®
Professional
Carpet Cleaner cartridges, which are specifically formulated
to be residue-free. Other carpet shampoo will leave residues
in the unit that will over a short period of time clog the
dispensing system and void your warranty.
fig. 10 Close tank cap and place the tank back on the cleaner. Lift the
gray latch to slide the tank upward into position until you hear a
“click”, signaling that the tank is securely locked into place.
Insert Cleaning Cartridge/Bottle:
NOTE: Cleaner will not operate without a cleaner cartridge locked
into the docking bay.
Remove the cleaner cartridge/bottle cap.
fig. 11
Insert the cleaner cartridge into the docking bay on the
side of the cleaner.
a. The directions on the cleaner cartridge must be facing out.
b. Lock and seal the cartridge in the cleaner by rotating the
white lever on cartridge from top to bottom.
Test and reset the A.L.C.I.:
fig. 5
Plug in the power cord. Press the test button to shut off
power. To reset the A.L.C.I., simply push in the red reset
button on the plug.
To Prepare Carpet
Always vacuum thoroughly before using the ORECK STEEMER
carpet and hard flooring cleaner. It provides excellent carpet and
hard floor cleaning on surfaces that are free of surface debris.
To achieve best results, high traffic areas and carpet stains should be
pretreated prior to cleaning using Steemer Full Release
®
Professional
Spot & Stain PreCleaner.
CAUTION: Before cleaning a carpet for the first time, test a small
area for color fastness.
Pour a small amount of Steemer Full Release
®
Professional Carpet
Cleaner on a clean white cloth and blot carpet. Examine this cloth for
color removal; if color appears on the cloth, the carpeting is not
colorfast and should not be cleaned with any wet extraction process.
NOTE: This product is not recommended for use on carpets made
from silk, velvet, wool and some cotton blends. Check the
manufacturer’s cleaning recommendations.
Operating Instructions
To Clean Carpets and Hard Flooring:
NOTE: DO NOT use on Hard Wood Flooring.
fig. 12 Turn the Shampoo/Rinse switch to the “SHAMPOO” position.
fig. 13 Place power switch in the “ON” position.
fig. 14 Press the red button in the handle and while lifting the handle
slightly, slowly pull the cleaner backwards. Pressing the button
releases the cleaner and water mixture. As you pull the nozzle
over the sprayed floor, the nozzle extracts the solution from the
floor and stores the dirty water in the recovery tank.
fig. 15 To move forward, slightly tilt the nozzle off the floor and roll the
cleaner forward. Repeat process working in small overlapping
rows for even cleaning until the entire room has been completed.
WARNING: Do not push forward! Pull the cleaner towards
you to clean. This cleaner has been specifically designed to
place the nozzle deep into the carpet.
Push down gently on the handle to lift the nozzle out of the
carpet, to move forward and reposition the cleaner.
IMPORTANT: Adjust the speed of the cleaning stroke to
your carpet and flooring conditions. Heavily soiled or
stained carpets or floors will require slower strokes. Avoid
oversaturating.
NOTE: The nozzle squeegee may be flipped for deeper
cleaning on deep pile carpets. See “To Replace Squeegee”
To shorten the drying time, go back over the floor pulling slowly
backwards without depressing the red button. Repeat this procedure
until you do not see water being pulled through the nozzle.
To Rinse Carpet and Hard Flooring:
fig. 12 Turn the Shampoo/Rinse switch to the “RINSE” position.
fig. 13 Place power switch in the “ON” position.