5
ENGLISH
The Belt
The belt on your vacuum cleaner controls the speed of the revolving
brush and is very important for the effective operation of the cleaner. If
the belt becomes stretched or cut, it will cause the revolving brush to
stop completely or slow down. See instructions in the manual for
replacing belt.
An extra belt is stored in the baseplate of your cleaner. When
buying replacement belts, use ONLY ORECK genuine belts. Belts
other than Oreck belts will not operate the revolving brush correctly
and may create undue stress which will cause damage to the motor
and brush bearings. Using belts other than ORECK belts will void
the warranty.
Lubrication
The vacuum cleaner motor bearings are factory lubricated and sealed.
Further lubrication is not required.
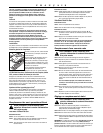
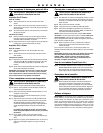
General Cleaner Care
At least once a month, check for and
remove excessive lint, string or hair from
revolving brush.
W
ipe the outside of the cleaner with a
damp cloth. Also clean the connector
deflector assembly area, base of cleaner
and fan housing area. If there is dust in
the outer bag, vacuum it or shake it out.
A little preventative maintenance will keep
your cleaner looking new and will ensure
continued cleaning effectiveness.
CAUTION—Wood Floors, Soft (Vinyl, Asphalt Tile, etc.) Floor
Surfaces and Polished Floor Finishes
Use floor and floor finish manufacturer’s recommended methods of
cleaning. The metal strip on the base of the cleaner could be damaged
if used on concrete or abrasive surfaces, and, therefore, cause damage
to wood floors, soft (vinyl, asphalt tile, etc.) floor surfaces and polished
floor finishes. The roller brush may also scuff very soft finishes.
Celoc
®
Hypo-Allergenic Filter System
The Celoc SMMS outer bag of your vacuum cleaner is high filtration
medical material designed to filter the smallest of dust particles. It is
important the inside of the outer bag be cleaned. Vacuum the inside of
the outer bag or hand wash, turned inside out, with warm water, and air
dry. For best results, the Celoc SMMS outer bag should be replaced
once a year.
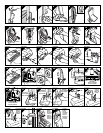
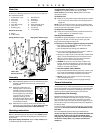
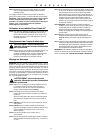
To Replace Filter Dust Bag
WARNING: Unplug cord from electrical
outlet before servicing.
Unit With Bag Dock:
Bag Removal:
fig. 6 Unzip outer bag completely.
fig. 7 Pull bag cardboard collar to release bag dock door from
connector
. Bag dock door will hinge downward.
fig. 8 Gently pull bag cardboard collar upward out of the bag dock.
Dust seal will close automatically.
Bag Installation:
fig. 9
Slide the cardboard collar completely onto bag dock door.
fig. 10 Firmly push bag dock door with both thumbs on indication point
until it snaps.
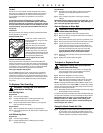
Unit Without Bag Dock:
Bag Removal:
fig. 6
Unzip outer bag completely.
fig. 11 Pull bag cardboard collar to release bag from connector
opening. Remove bag.
Bag Installation:
fig. 11 Hook bottom of bag collar opening under lip “B” of connector
assembly. Pull up on bag collar and snap over lip “A” of
connector.
fig. 12 Press on edges of bag collar to insure bag is completely
installed.
IMPORTANT: Check to make sure bag collar is behind lips “A” and
“B”. If it is not, dust will leak into outer bag. When filter bag is in
place, close outer bag with zipper fastener.
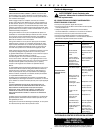
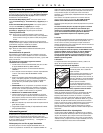
How to Replace a Worn Belt
WARNING: Unplug cord from electrical
outlet before servicing.
fig. 13 Remove the replacement belt from the storage channel.
fig. 14 Remove the door by removing the hold down screw located on
side of power head.
fig. 15 Slide the door forward by prying open with a screwdriver or coin.
fig. 16 Remove the belt from the motor drive shaft and brush roll pulley.
fig. 17 Loop the new belt over the motor drive shaft. Place the
opposite end of the belt on the brush roll pulley. Rotate the
brush roll three (3) complete revolutions to ensure that no part
of the belt is overhanging the end of the motor drive shaft.
For units with a belt retainer washer: There must be a
slight gap between the belt and belt retainer washer.
fig. 15
Replace the door by sliding it into the groove at the bottom of
the housing.
fig. 14 Replace the hold down screw and tighten.
To Adjust or Replace Brush
WARNING: Unplug cord from electrical
outlet before servicing.
fig. 18 To determine if the brush is worn, place a firm straight edge
across the nozzle opening. If brush bristles do not extend
beyond baseplate, brush should be adjusted.
fig. 19 Remove the baseplate by removing 5 screws.
fig. 20 Remove the belt and brush roll from the housing.
fig. 21 Rotate both bearing assemblies at ends of brush roll to show
"OLD" and replace in the holding channels in the housing.
NOTE: The bearing assembly setting marked "OLD" is smooth on the
top of the assembly. The one marked
"NEW" is notched. When rotating
bearings, make sure both bearing assembly settings are the same and
face up when replacing the brush roll.
fig. 18 Reassemble the belt and the baseplate and check bristle height
above baseplate at each end of brush.
If a previous adjustment has already been made and bristle height does
not extend above baseplate, a new brush assembly should be ordered.
IMPORTANT: Unless the brush is worn as indicated above, both
bearings must be in the “NEW” position. When rotating, both
bearings must be in the “OLD” position. Unmatched settings will
cause damage to your machine.
Using
An Oreck Fresh
Air
®
T
ab
fig. 22 Y
our ORECK
XL
vacuum cleaner has a special Oreck Fresh
Air
®
tab pocket. This air tab pocket is located inside the outer
bag in the area where the disposable paper bag attaches to the
connector assembly. Insert tablet in pocket if desired.