


45
W415-0661 / C / 02.20.08
Pilot will not light.
V
erify the "S" wire for the sensor and the "I" wire for the ignitor are connected
to the correct terminals (not reverse) on the module and pilot assembly.
Verify no loose connections, electrical shorts in the wiring or ground out to
any metal object.
Turn the ON/OFF switch to the "OFF" position. Remove the igniter wire "I"
from the module. Place the ON/OFF switch to the "ON" position. Hold a
grounded wire about 3/16" away from the "I" terminal on the module. If no
spark the "I" terminal module must be replaced. If there is a spark the "I"
terminal is fi ne. Inspect pilot assembly for a shorted wire or cracked insulator
around the electrode.
Makes noise with no
spark at pilot burner
- Igniter Spark gap is
incorrect
- spark gap of the ignitor to the pilot should be .17" tor 1/8"
- fi ll the tank.
- Out of propane gas.
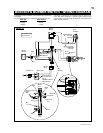
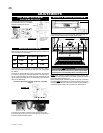
BGD36CFG TROUBLE SHOOTING GUIDE
B
EFORE
ATTEMPTING
TO
TROUBLESHOOT
,
PURGE
YOUR
UNIT
AND
INITIALLY
LIGHT
THE
PILOT
AND
THE
MAIN
BURNER
WITH
THE
GLASS
DOOR
REMOVED
.
SYMPTOM PROBLEM TEST SOLUTION
Pilot will not light.
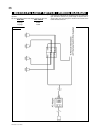
V
erify the transformer is installed and plugged into the module. Check volt-
age of the transformer under load at the spade connections on the module
with the ON/OFF switch in the "ON" position. Acceptable readings of a good
transformer are between 3.2 and 2.8 volts A.C.
Remove and reinstall the wiring harness that plugs into the module. Remove
and verify continuity of each wire in wiring harness.
Troubleshoot the system with the simplest ON/OFF switch
Verify the value and pilot assemblies are properly grounded to the metal
chassis of the fi replace or log set.
Turn the ON/OFF switch to the "OFF" position. Remove the igniter wire "I"
from the module. Place the ON/OFF switch to the "ON" position. Hold a
grounded wire about 3/16" away from the "I" terminal on the module. If no
spark the "I" terminal module must be replaced. If there is a spark the "I"
terminal is fi ne. Inspect pilot assembly for a shorted wire or cracked insulator
around the electrode.
Makes no noise with no
spark at pilot burner
Verify all connections. Verify the connections from the pilot assembly are tight;
also verify these connections are not grounding out to any metal.
Verify the fl ame is engulfi ng the sensor rod. This will increase the fl ame
rectifi cation. Verify correct pilot orfi ce is installed and inlet gas specifi cations
to manual. (Remember, the fl ame carries the rectifi cation current, not the
gas. If the fl ame lifts from pilot hood, the circuit is broken. A wrong orfi ce or
too high of an inlet pressure can cause the pilot fl ame to lift.) The sensor rod
may need cleaning.
Verify that the wire harness is fi rmly connected to module
Verify that the ceramic insulator around the sensor rod is not cracked, dam-
aged, or loose. Verify the connection from the sensor rod to the sensor wire.
Clean sensor rod with an emery cloth to remove any contamination that may
have accumulated on the sensor rod. Verify continuity with multimeter with
ohms set at the lowest range.
Continues to sparks
and pilot lights, but
main burner will not
light
Verify that the incoming gas line ball valve is "Open". Verify that the inlet
pressure reading is within acceptable limits, inlet pressures must not exceed
14" W.C.
Pilot sparks but will not light
- Transformer
-
A shorted or loose
Connection
- Improper switch wiring
- Faulty module
- Short or loose
connection in sensor rod
- Module is not grounded
- W
iring
- Loose connection
- Module
- Poor fl ame rectifi cation
or contaminated
sensor rod
- Poor grounding between
pilot assembly and
gas valve
- Damaged pilot or dirty
sensor rod
- Gas supply
Verify the value and pilot assemblies are properly grounded to the metal
chassis of the fi replace or log set.
- Module is not grounded