


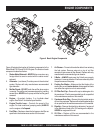

PAGE 24 —DRY PRIME PUMP — OPERATION MANUAL — REV. #3 (10/06/08)
Before Starting
1. Read safety instructions at the beginning of manual.
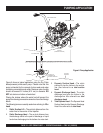
2. Place pump as near to water as possible. Level the pump with
jack stands. Rear jack stand on suction end of the pump must
be used as the weight of the suction hose filled with liquid
could cause the pump to tip. The jack stands can be moved
from side to side and optional extra jack stands can be added.
3. Fill the vacuum system with water. Water level should be up
to the middle of the hose below the priming system tank fill
reservoir. Fill with clean water, free of solids or foreign
material. Do not use salt water, water with abrasives, or acidic
water as this will cause damage to the system. Non-polluting,
environmentally-safe antifreeze should be used in freezing
conditions.
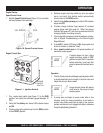
SETUP
Pump will not be able to begin
pumping unless the water level is up
to the middle of the hose below the
fill port tank
.
4. Check for
leaks
between pump and engine. If water is leaking
between the pump and bearing housing, the seal inside the
pump may be worn or damaged. Continued operation of the
pump is not recommended. Further usage of the pump under
these conditions may cause severe water damage to bearing
housing assembly.
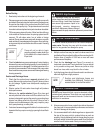
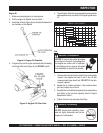
Suction and Discharge Hoses
1. Check that the suction hose is
securely
attached to the
pump. Make certain suction hose (Figure 3) does not have
any air leakage. Tighten hose clamps and couplings as
required.
2. Shorter suction lift and suction hose length will produce
better performance.
3. Make sure the
suction strainer
(Figure 6) is clean and
securely attached to the water end of the suction hose. The
strainer is designed to protect the pump by preventing large
objects from being pulled into the pump. Failure to use a
strainer could cause damage to the pump, impeller, pump
shaft, pump bearings, or wear plate.
4. If a strainer becomes clogged with debris, the strainer can be
cleared while the pump is running by opening the backflush
valve.
Suction and discharge hoses are
available from Multiquip. Contact your
nearest dealer for more information.
5. Multiple suction lines may be used but valves need to be
installed in all lines to adjust for different flows and suction lift.
Suction lines of lengths of 1000 feet or more will lower
performance of the pump.
6.
Check that
the
discharge
hose (Figure 6) is securely at-
tached and not restricted. Place hose so that it lays as straight
as it is possible on the ground. Remove any twists or sharp
bends from hose which may block the flow of water.
7. Light discharge hose should be anchored to avoid move-
ment with high flow or high pressure.
8. Always use a suction hose or pipe that matches the size of
the pump inlet to insure optimum performance and reduce
the risk of damage to the pump.
9. It is recommended that the discharge hose or pipe match
the size of the pump outlet to reduce friction as much as
possible. Using a discharge line that is larger than the pump
outlet will reduce friction and improve water flow. Similarly, a
smaller line will reduce water flow by increasing friction.
NOTE
NOTE
PVC discharge hoses and thin-walled
rubber hoses can easily fail at the end of
the hose fittings. Leaks from the hoses
can cause high-pressure liquid to be
discharged, causing dangerous
conditions. Make sure pressure rating of
hoses exceeds the pump maximum pressure to prevent hose
failure.
DANGER - High Pressure
The strainer should be positioned so it will remain completely
under water
. Running the pump with the strainer above
water for long periods can damage the pump.
CAUTION - Strainer Placement
DO NOT pump flammable fluids, corrosive chemicals or fluids
containing toxic substances. These fluids can create potentially
dangerous health and environmental hazards. Contact local
authorities for assistance.
DANGER - Flammable Fluids