


61D0006 17
CHIMNEY INSTALLATION
LOCATING CENTER LINE
You will need to lay out, cut and frame openings through all ceilings
and the roof at the point where the chimney will pass through.
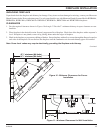
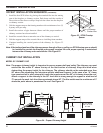
Place fireplace in planned position for installation. Unless the chimney
is to be offset, the point where the center line of the chimney will pass
through the ceiling and roof can be determined with a plumb line. See
Figure 16. Drive a nail in the center point.
Note: Make sure the chimney location is well away from
ceiling and roof joists and/or anything else that might
be in the way.
Drive a long nail through the roof from underneath to mark the roof
opening center line. Make sure the nail is long en ought to go through
the roof and be seen on the rooftop. If the chimney is to penetrate a
pitched roof, the hole in the roof must be rectangular instead of square
and should be sized according to Table 1.
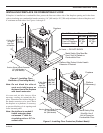
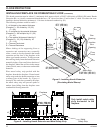
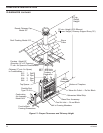
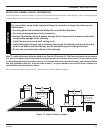
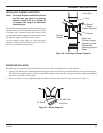
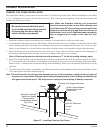
INSTALLING FIRESTOP SPACER
Install the firestop spacer from beneath the ceiling as shown in Figure 17
unless the space above is attic space.
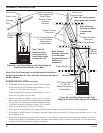
In an attic, install firestop spacer at the floor level of attic. You must have joists or headers on all four sides of the spacer.
Use a minimum of four (4) 8-penny nails to secure the spacer. See Figure 18.
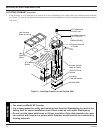
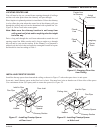
Figure 16 - Dropping Plum Line
from Ceiling
Center Line
to Chimney
Actual
Center Point
Plumb
Line
Plumb
Bob
Imaginary
Center
Point
Figure 18 - Installing Firestop Spacer
at Attic Level
Figure 17 - Installing Firestop Spacer
at Floor Level
Ceiling Joist
Inlet Air Pipe
Flue Pipe
Floor Joist
Header
Firestop Spacer
Chimney Section
Inlet Air Pipe
Flue Pipe
Header
Firestop
Spacer
Chimney Section