


21
8.5. Function settings (Function selection via the
remote controller)
8.5.1 Function setting on the unit (Selecting the unit functions)
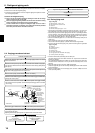
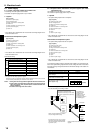
1) For wired remote controller [Fig. 8-21] (P.11)
1. Changing the external static pressure setting.
• Be sure to change the external static pressure setting depending on the duct and
the grill used.
1 Go to the function setting mode.
Switch OFF the remote controller.
Press the A and B buttons simultaneously and hold them for at least 2
seconds. FUNCTION will start to flash.
2 Use the C button to set the refrigerant address (3) to 00.
3 Press D and [--] will start to flash in the unit number (4) display.
4 Use the C button to set the unit number (4) to 01-04 or AL.
5 Press the E MODE button to designate the refrigerant address/unit number.
[--] will flash in the mode number (1) display momentarily.
6 Press the F buttons to set the mode number (1) to 08.
7 Press the G button and the current set setting number (2) will flash.
Use the F button to switch the setting number in response to the external static
pressure to be used.
8 Press the MODE button E and mode and the setting number (1) and (2) will
change to being on constantly and the contents of the setting can be confirmed.
9 Press the FILTER A and TEST RUN B buttons simultaneously for at least two
seconds. The function selection screen will disappear momentarily and the air
conditioner OFF display will appear.
0 To set the static pressure at 70,100,125Pa, repeat steps 3 to 9. (Set the mode
number to 10 for step 6.)
2. Other functions
1 Select unit number 00 for the settings. (Settings for all indoor units)
Refer to Function table 1.
2 Select unit number 01 to 04 or AL for the settings. (Settings for each indoor unit)
To set the indoor unit in the individual system, select unit number 01.
To set each indoor unit of two, three or four indoor units, which are connected
when these units are simultaneously in operation, select unit number 01 to 04.
To set all indoor units of two, three or four indoor units which are connected when
these units are simultaneously in operation, select AL.
Refer to Function table 2.
8. Electrical work
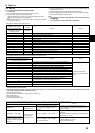
Function table 2
Select unit numbers 01 to 04 or all units (AL [wired remote controller]/07 [wireless remote controller])
*1 When the power supply returns, the air conditioner will start 3 minutes later.
Note: When the function of an indoor unit were changed by function selection after the end of installation, always indicate the contents by entering a or other mark in the
appropriate check filed of the tables.
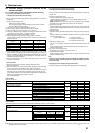
Function table 1
Select unit number 00
Settings
Not available
Available
Indoor unit operating average
Set by indoor unit’s remote controller
Remote controller’s internal sensor
Not Supported
Supported (indoor unit is not equipped with outdoor-air intake)
Supported (indoor unit is equipped with outdoor-air intake)
240V
220V, 230V
Energy saving cycle automatically enabled
Energy saving cycle automatically disabled
Mode no. Setting no. Initial setting Check
1 (*1)
01
2
1
02 2
3
1
03 2
3
1
04
2
1
05
2
Mode
Power failure automatic recovery*1
(AUTO RESTART FUNCTION)
Indoor temperature detecting
LOSSNAY connectivity
Power voltage
Auto mode
External static
pressure
35 Pa
50 Pa (before shipment)
70 Pa
100 Pa
125 Pa
Setting no. of mode
no. 08
2
3
1
2
3
Setting no. of mode
no. 10
1
1
2
2
2
2) For wireless remote controller [Fig. 8-22] (P.11)
1. Changing the external static pressure setting.
• Be sure to change the external static pressure setting depending on the duct and
the grill used.
1 Go to the function select mode
Press the CHECK button F twice continuously.
(Start this operation from the status of remote controller display turned off.)
CHECK
is lighted and “00” blinks.
Press the TEMP button C once to set “50”. Direct the wireless remote controller
toward the receiver of the indoor unit and press the Hour button A.
2 Setting the unit number
Press the TEMP button C and D to set the unit number to 01-04 or 07. Direct the
wireless remote controller toward the receiver of the indoor unit and press the
Minute button B.
3 Selecting a mode
Enter 08 to change the external static pressure setting using the C and D but-
tons.
Direct the wireless remote controller toward the receiver of the indoor unit and
press the Hour button A.
Current setting number: 1 = 1 beep (one second)
2 = 2 beeps (one second each)
3 = 3 beeps (one second each)
4 Selecting the setting number
Use the C and D buttons to change the external static pressure setting to be
used.
Direct the wireless remote controller toward the sensor of the indoor unit and
press the Hour button A.
5 To set the external static pressure
Repeat steps 3 and 4 to set the mode number to 10.
6 Complete function selection
Direct the wireless remote controller toward the sensor of the indoor unit and
press the ON/OFF button E.
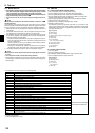
Note:
• Whenever changes are made to the function settings after installation or main-
tenance, be sure to record the changes with a mark in the “Setting” column of
the Function table.
3) Changing the power voltage setting (Function table 1)
• Be sure to change the power voltage setting depending on the voltage used.
Mode
Filter sign
External static pressure
Settings
100 Hr
2500 Hr
No filter sign indicator
Mode no. Setting no. Initial setting Check
1
07 2
3
1
08 2
3
1
10 2
3
35 Pa
50 Pa (before shipment)
70 Pa
100 Pa
125 Pa
2
3
1
2
3
1
1
2
2
2
External static
pressure
Setting no. of
mode no. 08
Setting no. of
mode no. 10
01_KD79D905H02_GB.p65 2012.2.6, 10:59 AM21