


6
HEAVY-DUTY STEAM CLEANER
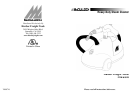
PRODUCT INFORMATION
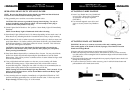
• The Lighted On/Off Switch (1) provides a clear visual indication of whether the unit is
powered on.
• The Steam Ready Light (2) indicates when the unit is ready to begin steaming.
• The Storage Compartment (3) is used for storing small accessories, and houses the Water
Reservoir cap.
• The Water Reservoir (4) is the tank in which water is stored for use by the unit. It is
accessed by removing the Water Reservoir cap found inside the Storage Compartment.
There must be a sufficient amount of water (16-48 oz. / 473-1,420 ml.) in the Water
Reservoir in order for the unit to properly function.
• The Handle (5) is designed to stay relatively cool while providing the optimum amount
of safety and user comfort.
• The Steam Lock Switch (6) is pushed forward to lock the Steam Button down and provide
continuous steam.
• The Steam Button (7) is depressed in order to release a spray of hot, penetrating steam
from the unit.
• The Carry Handle (8) provides a convenient place to set the main steam nozzle, and is
useful for carrying the unit up stairs and over obstacles.
• The Steam Jet Nozzle (9) focuses the spray of steam from the unit, and serves as the base
to which all other accessories connect.
• The Steam Hose (10) safely channels the flow of steam from the units boiler to the main
steam nozzle.
• The Floor Brush (11) is useful for cleaning floors and other large surfaces. The Cloth
Towel (16) attaches to the Floor Brush for cleaning tile and other hard surface floors.
• The Squeegee (12) can be used to clean mirrors, windows and other smooth glass
surfaces.
• The Extension Wands (13) connect to the main steam nozzle, allowing easy cleaning in
hard-to-reach places.
• The Water Funnel (14) and the Measuring Cup (15) are provided to assist you in
easily and consistently filling the Water Reservoir with the optimum amount of water
(16-48 oz. / 473-1,420 ml.).
• The Triangle Brush (17) is designed for cleaning corners and other difficult angles.
• The Assorted Utility Brushes (18) attach to the Steam Jet Nozzle, providing extra power
for removing exceptionally tough dirt and stains.
• The Brass Utility Brush (19) attaches to the Steam Jet Nozzle and is designed for
removing tough stuck-on grease and grime from ovens and grills.
• The Scrub Pad (20) attaches to the Steam Jet Nozzle and is used to clean porcelain and
countertops.
CARE &STORAGE GUIDELINES
11
PROPER STORAGE
Preparing your Heavy-Duty Steam Cleaner for storage is quick and simple. When you
have finished your steaming tasks, follow the steps listed below.
1. Switch Lighted On/Off Switch to “Off” position and unplug grounded power cord from
electrical outlet.
2. Allow unit to cool completely (at least 30 minutes).
3. Remove all accessories from unit.
4. Drain any remaining water in Water Reservoir into a sink or tub to prevent over-filling
during your next use.
5. Store accessories safely away, near Heavy-Duty Steam Cleaner. Utility Brushes can be
conveniently stored in the Storage Compartment.
6. Store Heavy-Duty Steam Cleaner in a cool, dry location.
REMOVING MINERAL BUILD-UP
A common problem with steam appliances is mineral build-up caused by high mineral
content in many municipal water supplies. The best way to avoid this is to use de-
mineralized or distilled water in unit. If you are unable to use de-mineralized or
distilled water, we recommend you use this procedure monthly to help avoid mineral
build-up:
1. Switch Lighted On/Off Switch to “Off” position and unplug grounded power cord from
electrical outlet. Allow unit to completely cool.
2. Remove all accessories from unit.
3. Flip up Storage Compartment lid and remove Water Reservoir cap.
4. Drain water from Water Reservoir into sink or tub.
5. Using Measuring Cup, make a mixture of 8 oz. (237 ml.) vinegar and 8 oz. (237 ml.)
water.
6. Slowly pour water-vinegar solution into Water Reservoir.
7. Allow to stand for 40 minutes.
8. Drain water-vinegar solution from Water Reservoir.
9. Rinse Water Reservoir with fresh water, drain and repeat until vinegar odor dissipates.
10. Replace Water Reservoir cap and lower Storage Compartment lid back down.