


9
FIREPLACE INSTALLATION
53D9042. Rev 1 03/03
LOCATION SELECTION
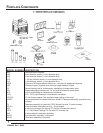
Unpack and check the fireplace and chimney for damage. If any items have been damaged, report this to your
dealer. Before beginning the installation, be sure you have the proper parts in sufficient quantity. Refer to
Figure 6 for proper identification of parts.
FIREPLACE INSTALLATION
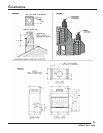
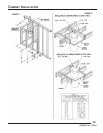
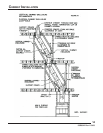
1. Refer to Figure 1 for an example of a typical installation of the fireplace components.
2. Be sure the location of the fireplace will provide the required clearances indicated by Figures 1, 2, 4, & 5
and the minimum chimney air space clearance to combustibles of two inches.
3. Set the fireplace in the desired location and be sure it is securely supported and leveled. Check the face
of the fireplace with a carpenter’s level and if it is not plumb; correct it by placing shims under the edges of
the fireplace.
4. Block in the fireplace to prevent any shifting of the firebox. Secure the fireplace with nails or screws
through the flanges located on each side of the fireplace. Do not enclose the fireplace until the combustion
air duct and chimney pipes are installed.
NOTE: Some local codes may require electrically grounding the fireplace and chimney.
CHIMNEY INSTALLATION
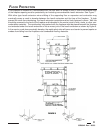
In order to assure safe and satisfactory performance of the fireplace, it is very important to properly install the
chimney. This is an important part of the installation and the sections of this manual pertaining to chimney
installation should be reviewed very thoroughly.
For your safety, some of the important things to remember in regard to chimneys are listed below:
1. Use only parts and accessories labeled for use with this fireplace.
2. Use only undamaged parts and accessories.
3. Enclose the chimney where it passes through the living spaces to prevent contact with and possible dam-
age to the chimney.
4. Install firestop spacers at each ceiling level.
5. Install the proper chimney cap or chimney housing on the chimney to prevent the entry of rain and debris
into the chimney and to assure the proper venting of smoke.
6. Do not use more than four elbows in the chimney.
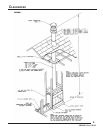
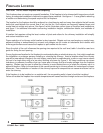
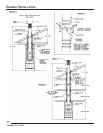
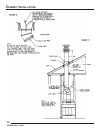
NOTE: To select the proper chimney height, refer to Figure 1. The flue outlet must be a minimum of three feet
above the highest point where the chimney penetrates the roof and a minimum of two feet above all portions of
the building within ten feet. If the chimney is to include elbows to offset the chimney, refer to the Chimney Offset
and Cap Installation section of this manual. There must be at least two inches air space between all sections of
the chimney and combustible materials between floors.
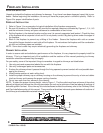
NOTE:
FLUE OUTLET SHOULD BE TWO FEET ABOVE ALL PORTIONS OF THE BUILDING
WITHIN TEN FEET AS SHOWN IN THE ILLUSTRATION. THE CHIMNEY MUST NOT
EXTEND MORE THAN 90 INCHES ABOVE THE ROOF WITHOUT ADDITIONAL SUPPORT.
24" MIN.
36"
24" MIN.
36"
10'
10'