


26
Vermont Castings Resolute Acclaim
2000893
Replace Broken Glass Immediately
Do not operate the Resolute Acclaim if the glass is
damaged. Use the following procedure for glass
replacement. NOTE: Replace glass with Vermont
Castings’ replacement glass only, available from your
local dealer.
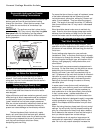
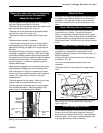
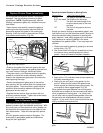
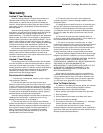
• Open the door and carefully remove the glass by
removing the two clips (one per side) that hold the
glass panel against the gasket in the arched door
opening. Each clip is held in place with two Phillips
truss-head machine screws. (Fig. 36)
• Examine the gasket that seals the glass to the door
frame. Replace if necessary with gasket obtained from
your local Vermont Castings’ Authorized Dealer.
• The glass used in your Resolute Acclaim is specially
coated on one side with a heat reflecting material.
Examine the replacement glass panel, and notice the
markings along the edge.
• Center the replacement glass panel in the arched
door opening, with the marked side of the glass panel
facing the gasket. There should be a gap to allow for
expansion and contraction between the edge of the
glass panel and the cast iron.
• Replace the two retainer clips and fasten with the
previously removed screws. Tighten the screws slowly
and evenly; do not overtighten.
How to Replace Gaskets
The Resolute Acclaim uses rope-type fiberglass
gaskets to make a tight seal between some parts. With
use, particularly on those parts that move, gaskets can
become brittle and compressed and can begin to lose
their effectiveness. These will need periodic replace-
ment.
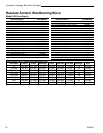
All of the gaskets used are made of fiberglass. The
three sizes of replaceable gasket are listed below,
along with their application.
Resolute Acclaim Gaskets on Moving Parts
Gasket Size... ...And The Parts It Seals
3/16" The glass to the load door frame
5/16" wire mesh The griddle to the stove top
1/2" The arch and bottom edge of the
innerfront stove panel to the front
load door
1/2" The front of the grate to the front
load door
Should you need to change a replaceable gasket, wait
until the fire is out and the stove has cooled. Be sure to
follow the standard safety procedure for working with
dusty materials: wear safety goggles and a dust mask.
The procedure for replacing gaskets is the same,
regardless of the gasket location. Four easy steps are
involved:
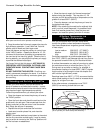
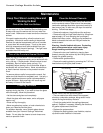
1. Remove the existing gasket by grasping an end and
pulling firmly. (Fig. 37)
2. Use a wire brush or the tip of a screwdriver to clean
the channel of any remaining cement or bits of
gasket. Use a cold chisel for stubborn deposits.
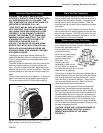
3. Apply a thin (1/8") unbroken bead of stove cement to
the newly-cleaned groove.
4. Starting at one end, pack a new gasket into the
groove. Where the two ends of the gasket meet,
ensure a good joint before trimming any excess. Do
not overlap or leave ragged edges. (Fig. 38)
Other gaskets form seals between non-moving parts,
but these are not subject to the same wear and deterio-
ration as gaskets on moving parts. It is unlikely that
you will ever need to replace these gaskets unless the
involved parts are disassembled and then put back
together. In any event, this is a job that should be done
only by qualified service personnel.
Fig. 37 Remove gasket, then clean channel with wire brush.
ST560
C
em
en
t
S
to
ve
G
ask
et
ST561
Fig. 38 Lay a bead of gasket cement then press gasket in
place.
Glass
Panel
Retainer Clip
3/16” Gasket
ST625
Fig. 36 Glass replacement.