


Fireplace Insert Installation (for qualified installers only) 17
© Travis Industries 100-01166 4040907
SAFETY NOTICE:
Please read this entire manual before you install and use your new room heater. Failure
to follow instructions may result in property damage, bodily injury, or even death.
Contact local building or fire officials about restrictions and installation inspection
requirements in your area.
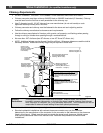
Planning The Installation
We suggest that you have an authorized Travis Industries dealer install your fireplace insert. If you
install the fireplace insert yourself, your authorized dealer should review your installation plans.
Check with local building officials for any permits required for installation of this fireplace insert and
notify your insurance company before proceeding with installation.
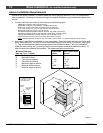
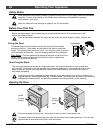
Preparation for Installation
• Check for damage to the exterior of the fireplace insert (dents should be reported, scratches can be
fixed by applying touch up paint).
• Check the interior of the firebox (replace cracked firebrick and make sure baffle is in place).
The fireplace insert can be lightened by removing the firebricks and baffle (pg 34) - replace before
operation.
Additional Accessories Needed for Installation
• Door Shell (Black 99300195 Brass 99300196 or Pewter 99300197 - see 38)
• Surround Panels (see page 44)
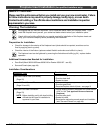
Installation Considerations
Installation Type
Considerations
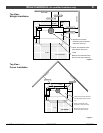
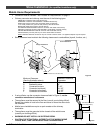
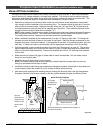
Insert with Positive Flue (Full Reline)
(Page 22)
• Utilizes existing masonry or zero clearance fireplace
• Provides best draft
• Easiest to clean
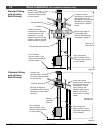
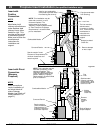
Insert with Direct Connect Flue
(Page 22 and 23)
• Utilizes existing masonry or zero clearance fireplace
• Provides good draft
• Requires fireplace block-off plate - see page 21
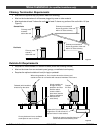
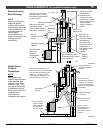
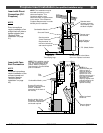
Insert with Face Seal Connection
(Page 23)
NOTE: Before installing verify with local building
officials that this type of installation is
approved in your area.
• Utilizes existing masonry fireplaces with cross section
of 28" to 144" (not approved for zero clearance
fireplaces)
• Provides okay draft
• Easiest to install
• Requires the optional surround panels and insulation
(see "Surround Panels" on page 44).