


2 Maintenance (continued)
29
Service Manual
Follow the Service and maintenance procedures given throughout this manual and in component literature
shipped with the boiler. Failure to perform the service and maintenance could result in damage to the boiler
or system. Failure to follow the directions in this manual and component literature could result in severe
personal injury, death, or substantial property damage.
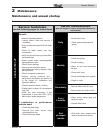
The boiler should be inspected annually only by a qualified service technician. In addition, the maintenance
and care of the boiler designated in Table 2-1 and explained on the following pages must be performed to
assure maximum boiler efficiency and reliability. Failure to service and maintain the boiler and system could
result in equipment failure.
Electrical shock hazard – Turn off power to the boiler before any service operation on the boiler except as
noted otherwise in this instruction manual. Failure to turn off electrical power could result in electrical
shock, causing severe personal injury or death.
Address reported problems
1. Inspect any problems reported by the owner and correct
before proceeding.
Inspect boiler area
1. Verify that boiler area is free of any combustible
materials, gasoline and other flammable vapors and
liquids.
2. Verify that air intake area is free of any of the
contaminants listed in Section 1 of the Knight XL
Installation and Operation Manual. If any of these are
present in the boiler intake air vicinity, they must be
removed. If they cannot be removed, reinstall the air and
vent lines per this manual and the Knight XL Installation
and Operation Manual.
Inspect boiler interior
1. Remove the front access cover and inspect the interior of
the boiler.
2. Vacuum any sediment from inside the boiler and
components. Remove any obstructions.
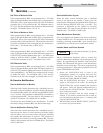
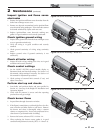
Clean condensate trap
1. Inspect the condensate drain line, condensate PVC
fittings, and condensate trap.
2. Remove the PVC cap retaining screw from the PVC cap
(FIG. 2-1).
3. Remove the 2 inch PVC cap with the switch located at the
top of the trap (FIG. 2-1).
4. Remove any sediment in the trap.
5. Fill with fresh water until the water begins to pour out of
the drain.
6. Replace the cap. Press the cap onto the trap until the cap
makes contact with the drain.
7. Replace the retaining screw.
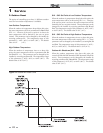
Eliminate all system or boiler leaks.
Continual fresh makeup water will reduce
boiler life. Minerals can build up in
sections, reducing heat transfer,
overheating heat exchanger, and causing
heat exchanger failure. Leaking water may
also cause severe property damage.
1. Inspect all water and gas piping and verify to be leak free.
2. Look for signs of leaking lines and correct any problems
found.
3. Check gas line using the procedure found in Section 7 -
Gas Connections of the Knight XL Installation and
Operation Manual.
Check all piping for leaks
The condensate trap must be filled with
water during all times of boiler operation
to avoid flue gas emission from the
condensate drain line. Failure to fill the
trap could result in severe personal injury
or death.
ƽ WARNING
ƽ WARNING
ƽ WARNING
ƽ WARNING
ƽ WARNING
PVC TEE ASSEMBLY
(FACTORY SUPPLIED)
TO FLOOR
DRAIN
2” PVC CAP WITH
BLOCKED DRAIN SWITCH
RETAINING
SCREW
CONDENSATE FROM
HEAT EXCHANGER
Figure 2-1 Condensate Trap