


10
Remove boiler from wood pallet
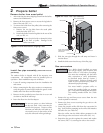
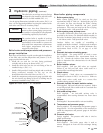
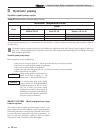
1. After removing the outer shipping carton from the boiler,
remove the installation kit.
2. Remove the front access covers to access the lag bolts in
front of the unit (FIG. 2-1).
3. To remove the boiler from the pallet (after removing the
front access covers):
a. Remove the two lag bolts from the wood pallet
inside the boiler (FIG. 2-1).
b. Detach the boiler from the lag bolts in the rear of the
unit, see FIG. 2-1.
Do not drop the boiler or bump the jacket
on the floor or pallet. Damage to the
boiler can result.
For a boiler already installed, you must
turn off gas supply, turn off power and
allow boiler to cool before proceeding.
You must also completely test the boiler
after conversion to verify performance
as described under Start-up, Section 7
of this manual. Failure to comply could
result in severe personal injury, death, or
substantial property damage.
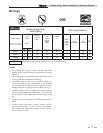
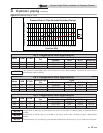
You must install a propane orifice to
operate the outdoor boiler on propane
gas. Verify when installing that the orifice
size marking matches boiler size (Table
2A).
. 2
Figure 2-1 Boiler Mounted on Shipping Pallet
Gas conversions
NOTICE
ƽ WARNING
1. Remove the top and front access covers from the unit
(tools required for removal).
2. Remove the three screws securing the gas valve to the
venturi (FIG. 2-3).
3. Locate the propane orifice disk from the conversion kit
bag. Verify that the stamping on the orifice disk matches
the boiler size (see Table 2A).
Place the orifice into the black rubber grommet in the
side of the gas valve and secure in the valve (FIG. 2-3).
4. Reposition the gas valve against the venturi and replace
the screws (FIG. 2-3) securing the valve to the venturi.
2 Prepare boiler
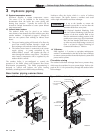
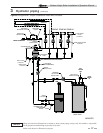
WALL STRAP SCREWS
BIRD SCREEN
FLUE PIPE
ELBOW
FLUE ADAPTER
IMG00443
WALL STRAP
NOTE: VERIFY GASKETS ARE
SEATED EVENLY INSIDE
THE GROOVE.
AIR COVER
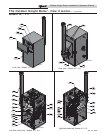
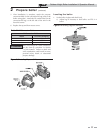
Figure 2-2 Install Flue Pipe Assembly
5. Slide the vent pipe through the wall strap and insert it
into the elbow.
6. Install the bird screen into the top of the flue pipe.
Install flue pipe assembly (reference FIG. 2-2 for flue
pipe assembly)
The outdoor boiler is shipped with all the necessary vent
components. All components must be installed prior to
operation. Basic installation steps are as follows:
1. Locate all venting components from the installation kit
and carton.
2. Before connecting the flue pipe sections or components,
verify the gasket is seated evenly inside the groove in the
female end of the elbow and flue adapter.
3. Remove the kit provided screws from the air cover and
use them to install the wall strap.
4. Insert the elbow into the flue adapter.
ƽ CAUTION
Do not use grease or other lubricant
on the vent seals. Only water may be
used for this purpose. Grease or other
lubricant can make the seal brittle or it
can result in tears in the surface of the
seal, this will result in flue gas leakage.
Outdoor Knight Boiler Installation & Operation Manual