INSTALLATION OF BASIC OR ADVENT LYTESPAN TRACK INTO HOUSINGS
1S:6440
Paae 3 of z
------
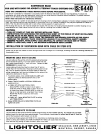
Each straiaht run of track is started with an lNDIVi DUAL TRACK UNIT and continued with JOINER TRACK UNITS.
To cut track, see Instruction Sheets supplied with Track. 1S:6020 or 1S:6121.
I
ALLEN HEAD SCREW
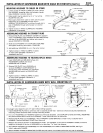
ASSEMBLE MOUNTING CLIPS TO TRACK
B
7/8” Long for Basic Track,
1[2’( Long for Advent Track
1.
Prepare MOUNTING CLIP ASSEMBLIES as shown.
2. Remove DEAD END COVER from INDIVIDUAL
—CAPTIVE NUT
TRACK UNITS, see Fig. 8. Insert MOUNTING
CLIPS into end of each track unit and slide
SPACER.Useonly
N
for Basic Track
along track until ends of clips engage alignment
CH
holes. Check that allen head screw lines up with
MOUNTINGCLIP
MOUNTINGCLIP
hole in track.
ASSEMBLY
FIG. 7
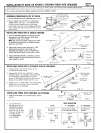
INSTALLING TRACK INTO A SINGLE HOUSING
HOUSING
1. Unscrew BOTTOM COVER and remove KO from
top plate on LIVE END. Reinsert DEAD END
COVER into other end of track.
NOTE: See Instruction Sheet supplied with track
WALL MOUNTING
for additional instructions on installing supply
KIT
leads into LIVE END.
INDIVIDUAL TRACK
2. Pass supply leads through openings in LIVE
UNIT (Basic)
END observing polarity. Insert track into
1.
MOUNTING CLIP ASSEMBLY
HOUSING and tighten screws in MOUNTING
...
~ALLEN WRENCH - ‘
CLIPS with allen wrench to lock track in place.
CAPTIVE NUT
3. Fasten BOTTOM COVER to LIVE END. Connect
SUPPLY LEADS to screw terminals as shown in
track IS:6020 or IS:6121.
BOTTOM COVER
INSTALLING TRACK INTO A STRAIGHT RUN OF HOUSINGS
c1
,.
/-
,/
1. Follow previous instructions except do not
Q’
ENDPLATE
reinstall DEAD END COVER.
..’
HOUSING
,.-
2. Remove
END PLATE from HOUSING. Insert
JOINER TRACK into HOUSING, plug COUPLER
~
‘~jjf%ij~;jR
into INDIVIDUAL TRACK UNIT and tighten
INDIVIDUALTRACK
.:::$J
TrackUnN)
screws in MOUNTING CLIPS with allen wrench,
UNIT(Bas[c)
Repeat for all JOINER TRACK UNITS in run.
@-
~
A
~
JOINERTRACK
UNIT(Basic)
3. Tighten screw in COUPLER(S). Insert DEAD E?JD
/“
MOUNTINGCLIP
COVER into end of track run and insert END
-“3
,//
ASSEMBLY
PLATE into end of HOUSING.
1
..’
{
#/&;:H
COUPLER ~ SCREW
FIG. 10
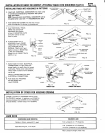
INSTALLING TRACK INTO HOUSINGS IN PATTERNS
* .k
e
r
INDIVIDUAL TRACK
-. - ..-
UNIT (Basic)
1.
Remove LIVE ENDS from all INDIVIDUAL TRACK
c
LIVE END x - ‘=’ .
UNITS.
(discard)
. --- :>-\-
LOOSEN SCREW
TO REMOVE
FIG. 11
2. Lay out the track
TRACK ORIENTATION
per the layout ot tne
Corner
“T”
Intersection
HOUSINGS following
“X” Intersection
the track orientation
shown in Fig. 12. Note
that each straight run
of track consists
of an INDIVIDUAL
An M. ‘f:~ ““’f’i~;:f’s” ‘“;
Plus JOINERS.
R[ghtof
Left of
Track = R Track = L
R
5
~j ~~
L]R+
FIG. 12


