


19
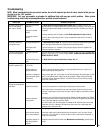
SYMPTOM PROBABLE CAUSE CORRECTIVE ACTION
Thin black coating (soot)
forms on the viewing
glass, logs, or firebox
Improper log or ember
placement
Improper air shutter
setting
Not enough combus-
tion air
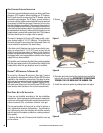
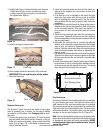
See Brick Panel and Log Set Installation on Pages 10 & 11. If there is soot in one
specific location, the rockwool below this location needs to be adjusted. This can be done
by pulling embers forward slightly. If the flames have soot tails, the shutter will need to
be opened.
If sooting continues open air shutter (see Air Shutter Adjustment on Page 12 & 13
)
Check for debris obstructing air flow in valve compartment under insert or in front of
lower venting.
Humming or whistling
coming from insert.
Normal operating noise
Obstructed orifice
opening
See Quiet Operation on Page 15. The noise may be reduced by slightly turning down the
flame. Turning the flame down will reduce the heat output of the insert.
If noise is excessive or is “whistling” have your gas supplier check the regulator and
orifices and replace if necessary.
A change in flame appear
-
ance or burner operation.
A change in gas pres-
sure
Improper ember place-
ment
Have your gas supplier check for correct gas pressure (7" W.C. / po. C.E. [1.74 kPa] natu-
ral gas; 11" W.C. / po. C.E. [2.74 kPa] LP gas). NOTE: NEVER BLOCK OR OBSTRUCT AIR
INTAKE OR OUTLET VENTS.
See Brick Panel and Log Set Installation on Pages 10 & 11.
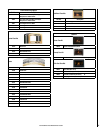
Spark igniter will not light
pilot after repeated tries.
No gas supplied to unit
or air in line
Defective igniter (no
spark at electrode)
Defective or misaligned
electrode at pilot (spark
at electrode)
Check gas supply. To purge, hold in gas cock on valve for 1-2 minutes and try again.
Check for spark at electrode and pilot, if no spark and electrode wire is properly con
-
nected, replace igniter and igniter wire.
Using a match, light pilot. If pilot lights, turn off pilot and trigger the igniter again. If pilot
lights, an intermittent gas/air supply may be the problem, if longer purge will not light
- check gap between electrode and pilot - should be 1/8 inch (3 mm) to have a strong
spark. If OK, replace pilot.
Pilot will not stay lit after
carefully following lighting
instructions.
Low gas inlet pressure
Defective thermopile
Defective automatic
valve operator
Check inlet pressure and adjust pilot if necessary.
Be sure wire connections from thermopile are tight at gas valve terminals.
Either rocker switch or thermostat wires may be grounded. Remove wires from valve
terminals. If pilot stays lit, trace switch wiring for a ground. May be grounded to insert or
gas supply.
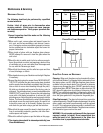
Check open circuit millivolt output of thermopile. Reading should be greater than 325mV.
Also check thermopile wire for kinks that can cause loss of mV. Replace faulty thermopile
if wire is okay and reading is less than 325mV.
Turn valve knob to “ON” and thermostat (if installed) to 90º. Millivolt meter should read
greater than 100 mV. If reading is OK and burner does not turn on, replace gas valve
(qualified service technician only).
Main burner will not burn. Pilot has gone out
Rocker switch, thermo
-
stat, or wires defective
Thermopile may not be
generating sufficient
millivolts
See Lighting Instructions.
Disconnect rocker switch and thermostat wires at terminals 1 and 3 on valve. Jumper
across from 1 to 3 with pilot lit. If burner comes on either rocker switch, thermostat, or
wiring is not functioning.
Check thermopile with millivolt meter (see Maintenance and Servicing), recheck symp
-
tom #2.
Troubleshooting
NOTE: When troubleshooting the gas control system, be sure the external gas shut off valve, located at the gas sup-
ply inlet is in the “ON” position.
IMPORTANT: Call your gas supplier or plumber for additional help with any gas control problem. Valve system
troubleshooting should only be accomplished by a qualified service technician.