


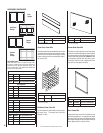


NOTE: DIAGRAMS & ILLUSTRATIONS NOT TO SCALE.
11
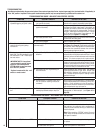
MAINTENANCE TASK ACCOMPLISHING PERSON PROCEDURE
Inspecting/Cleaning Burner, Logs
and Controls
Qualifi ed Service Technician Inspect valve and ensure it is properly operating. Check piping
for leaks. Vacuum the control compartment, fi replace logs and
burner area.
Check Flame Patterns and Flame
Height
Qualifi ed Service Technician
Refer to Figure 15 on Page 13 and verify the fl ame pattern
and height displayed by the appliance conforms to the picture.
Flames must not impinge on the logs. Ensure fl ames are steady
(not lifting or fl oating).
Inspecting/Cleaning Pilot and Burner Qualifi ed Service Technician
Refer to Figure 17 and Figure 18 on Page 14. Remove any
surface build-up on pilot and burner assembly. Wipe the pilot
nozzles, igniter/fl ame rod and hood. Ensure the pilot fl ame
engulfs the fl ame sensor as shown.
Checking Vent System Qualifi ed Service Technician Inspect the vent system at the top and at the base (within the
fi rebox) for signs of blockage or obstruction. Look for any signs
of dislocation or deterioration of the vent components. Note:
Inspect wall straps or plumbers's tape to ensure it is secure
and in place.
Appliance Checkout Qualifi ed Service Technician Perform the appropriate appliance checkout procedure detailed
in this manual.
Replacing Rockwool Ember Materials Homeowner/Qualifi ed Service
Technician
Remove old ember materials (rockwool) and vacuum the ember
placement area. Place new embers as described in Step 6 on
Page 11.
MAINTENANCE SCHEDULE - Annually (Before the onset of the Burning Season)
MAINTENANCE TASK ACCOMPLISHING PERSON PROCEDURE
Cleaning Firebox Interior Homeowner Carefully remove logs, embers (rockwool), and vermiculite.
Vacuum out interior of the fi rebox. Clean fi rebox walls and
log grate. Replace logs, embers (rockwool) and vermiculite as
detailed in this manual (see Pagexs 8-10 ).
Check Flame Patterns and Flame
Height
Homeowner
Refer to Figurex 15 on Pagex 10 and verify the fl ame pattern
and height displayed by the appliance conforms to the picture.
Flames must not impinge on the logs.
Checking Vent System Homeowner Inspect the vent system at the top and at the base (within the
fi rebox) for signs of blockage or obstruction. Look for any signs
of dislocation of the vent components.
Cleaning Front Glass Enclosure Panel Homeowner Clean as necessary following the directions provided in this
manual. DO NOT TOUCH OR ATTEMPT TO CLEAN GLASS
WHILE HOT.
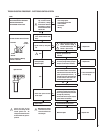
MAINTENANCE SCHEDULE - Periodically (After the Burning Season)
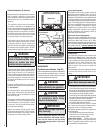
2. Light appliance (follow lighting procedure on
lighting label in control compartment or see
homeowners manual).
3. Allow the burner to operate for at least 15 min-
utes while observing the fl ame continuously to
ensure that the proper fl ame appearance has
been achieved (see Figure 15). If the following
conditions are present, adjust accordingly.
• If flame appears weak or sooty, adjust the
air shutter, incrementally, to a more open
position until the proper fl ame appearance
is achieved.
• If fl ame stays lowered blue, adjust the air
shutter, incrementally, to a more closed
position until the proper fl ame appearance
is achieved.
4. Leave the control knob (off/pilot/on) in the ON position and the burner OFF/ON switch OFF (& remote switches, if applicable).
5. When satisfi ed that the burner fl ame appearance is normal, close the lower control compartment door.
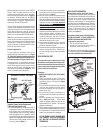
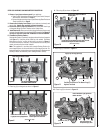
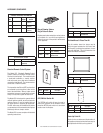
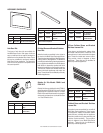
Adjustment Rod Positions
(when viewed from above)
Figure 16
Main Burner Factory Air Shutter
Opening Setting - All Models
Model Natural
Gas
Propane
Gas
MPB35ST
1/8”
3.2mm
1/4”
6.4mm
Increase Shutter Opening
In This Direction
Decrease Shutter Opening
In This Direction
Note - Burners are
omitted in this
view for clarity.
Orifi ce
Air Shutter
Adjusting
Rod