


NOTE: DIAGRAMS & ILLUSTRATIONS NOT TO SCALE.
9
WARNING: THE FIREPLACE MUST BE
UNPLUGGED/DISCONNECTED FROM THE
POWER SUPPLY PRIOR TO ANY MAINTE-
NANCE OR CLEANING IN ORDER TO REDUCE
THE RISK ELECTRIC SHOCK OR FIRE.
CAUTION: DO NOT EXCEED A 35 WATT BULB.
USE OF A HIGHER RATED BULB MAY RESULT
IN A FIRE, CAUSING PROPERTY DAMAGE,
PERSONAL INJURY OR LOSS OF LIFE.
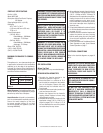
Replacing Light Bulbs
b. Flame Cylinder Bulbs
i. Remove Brick panel, following proce-
dure on page 8 (see Brick panel Removal
Procedure).
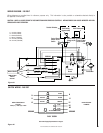
Figure 12
Ember Bed
Ember Bed
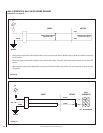
Figure 13
Bulb
Bulb
Bulb
Bulb
Figure 14
Figure 15
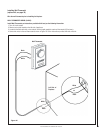
Figure 16
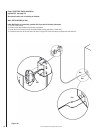
Figure 17
Figure 18
Brick panel Retain-
Brick panel Retain-
ing brackets
ing brackets
Flame
Flame
Panel
Panel
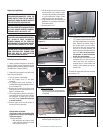
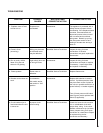
iii. Locate fl ame cylinder drum (see Figure
17). Squeeze one half of drum cylinder
until its top edge clears the top drum
track. Remove the bottom edge of
the cylinder drum from the bottom
drum track. Once you have removed
one half of the drum cylinder, you
will have access to the 2 light bulbs (see
Figure 18). Note: do not exert exces-
sive pressure on the drum cylinder
as this may cause damage.
v. Lift off spring from bulb tips, then hold
socket and pull bulb out to remove.
Install new bulbs into sockets by
pressing them in (while holding the
socket), Install retaining spring over
each bulb tip.
7. Reinstall all components that were removed
(reverse steps 1-5).
Flame Cylinder Drum
Flame Cylinder Drum
Bulbs
Bulbs
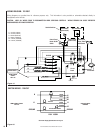
Bulb Replacement Procedure:
• 2 bulbs provide illumination for the ember
bed and 2 bulbs provide illumination for the
fl ame generation assembly (bulbs are rated at
35 Watts Max., Halogen, GX6.35).
• 2 spare bulbs are located in a recess on the
back of the log assembly.
1. Turn off power to the fi replace.
2. Let the fireplace cool, if it has been
operating.
3. (If optional glass panel enclosure is
installed) Remove glass panel per instruc-
tions provided in kit.
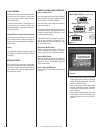
4. Remove the 2 screws on the front of the
grate (see Figure 12. Also see item #7 on
page 17). Remove Grate.
5. Lift out log/ember assembly by tilting for-
ward and fi rmly pulling on back of ember
bed assembly. It should pop out from
track and lift out. Caution: Be careful not
to scratch the fi nish.
6. Remove spare bulbs from the recess on
the back of the log assembly.
Access bulbs as follows:
Use gloves or cloth when handling bulbs
to prevent oils from your skin damaging
bulbs when heated.
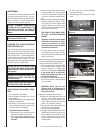
a. Ember Bed Bulbs -
i. With the ember bed removed, the 2
ember bed light bulbs will be visible
(see Figures 13 and 14).
WARNING: THE HALOGEN LIGHT BULBS IN
YOUR FIREPLACE CAN BECOME EXTREMELY
HOT. ALLOW AT LEAST 10 MINUTES
BETWEEN TURNING OFF THE FIREPLACE
AND REMOVING THE LIGHT BULBS TO AVOID
THE ACCIDENTAL BURNING OF THE SKIN.
CAUTION: DO NOT TOUCH THE BULBS, OILS
FROM YOUR SKIN WILL DAMAGE THEM
WHEN THEY HEAT UP. USE GLOVES OR
CLOTH WHEN HANDLING BULBS.
ii. using a phillips screwdriver, remove
the fl ame panel (see Figure 16).
Grate
Grate
Log/Ember Assembly
Log/Ember Assembly
ii. Lift off spring from bulb tips, then hold
socket and pull out to remove. Install
new bulbs into sockets by pressing them
in (while holding the socket), Install
retaining spring over each bulb tip.
iii. Plug in power cord or connect power to
appliance. Turn on power to test bulbs.
Disconnect power.
iv. Reverse steps 3 to 5.