


LENNOX HEARTH PRODUCTS • MERIT
®
PLUS DIRECT VENT GAS FIREPLACES (MPD33/35/40/45) • INSTALLATION INSTRUCTIONS
34
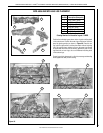
NOTE: DIAGRAMS & ILLUSTRATIONS ARE NOT TO SCALE.
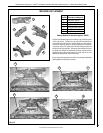
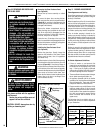
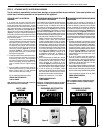
Figure 64
Combustible
Finished Wall
Materials
Min. 1"
(25 mm)
This area must remain
clear of combustible
materials.
Combustible
material may
touch top of
appliance.
Combustible
materials
NOT allowed
below this point
on face
of appliance.
Header
Spacing
Top Standoff
Top of Appliance
Top of Door Frame
Hood must be installed as shown.
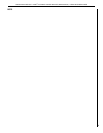
Louvers
Louver Face Models
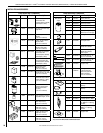
Combustible
Finished Wall
Materials
Top of Appliance
Min. 1"
(25 mm)
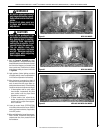
Clean Face Models
Top of Door Frame
Hood must be installed as shown.
Radiant panel
This area must remain
clear of combustible
materials.
Combustible
material may
touch top of
appliance.
Combustible
materials
NOT allowed
below this point
on face
of appliance.
Header
Spacing
Top Standoff
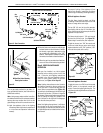
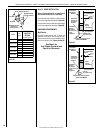
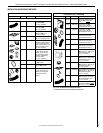
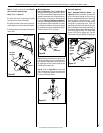
Adjustment Rod Up
(Fully Open Position)
Air Shutter
Burner Tube
Adjusting Set Screw
Adjustment Rod Down
(minimum air
opening position)
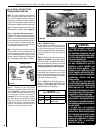
sledoM
saG
epyT
RIAYROTCAF
RETTUHS
GNITTES
)mm(sehcni
8233-TDPM
.taN 23/1 )8.O(
.porP 61/3 )67.4(
8233-RDPM
.taN 23/1 )8.O(
.porP 61/3 )67.4(
0353-DPM
.taN 23/1 )8.O(
.porP 61/3 )67.4(
5304-DPM
.taN 8/1 )2.3(
.porP 2/1 )31(
0454-DPM
.taN 8/1 )2.3(
.porP 2/1 )31(
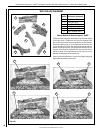
Figure 65
Figure 66
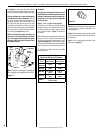
Step 12. HOOD INSTALLATION
Refer to Figures 65 and 66. All models must
have hoods installed prior to operating.
On all clean face units, slide the hood into the slots
on the lower edge of the radiant panel (Figure 65).
On louvered face units, slide the hood into the slots
on the lower edge of the cabinet top (Figure 66).
FINISHING REQUIREMENTS
Wall Details
Complete finished interior wall. To install the
appliance facing flush with the finished wall,
position framework to accommodate the thick-
ness of the finished wall (Figures 65 and 66 )
See Page 5 for
Cold Climate Insulation and
Page 8 for Clearances.