


10
NOTE: DIAGRAMS & ILLUSTRATIONS NOT TO SCALE.
When satisfied that the appliance operates
properly, proceed to finish the installation.
Leave the control knob/lever in “ON” position
and turn the remote switch “OFF.” Replace the
refractory access panel.
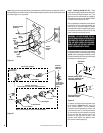
Figure 21
FINISHING REQUIREMENTS
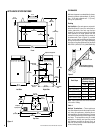
Wall Details and Combustible Mantels
Adjustment
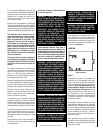
To adjust the flame, position the air shutter to
the nominal setting
(Figure 21 )
. Allow the
burner to operate for at least 30 minutes. Ob-
serve the flame continuously. If it appears weak
or sooty as previously described, adjust the air
shutter open or closed until desired effect is
achieved.
Note: If the flame still appears anemic with the
air shutter closed all the way (usually a result
of lengthy vertical venting runs), turn off the
appliance, turn off the gas supply, wait for the
parts to cool and access the air shutter. The
shutter is prevented from actually closing by a
tab that is bent over into the opening. Remove
this obstruction by bending back. Reassemble
and restart the appliance and after 30 minutes
reobserve the flame. Adjust the air shutter as
described.
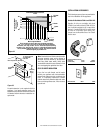
Complete finished interior wall. To install the
appliance facing flush with the finished wall,
position framework to accommodate the thick-
ness of the finished wall
(Figure 22 )
. This
figure also indicates vertical installation clear-
ances to combustible mantels.
Figure 23
also
shows an example of a combustible mantel
shelf projecting a maximum of 12" (305 mm)
from the wall, and which must be installed a
minimum distance of 14 ¹⁄₂" (368 mm) from
the top of the firebox opening.
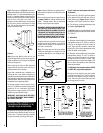
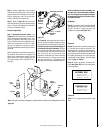
Figure 20
Proper Flame
Adjustment
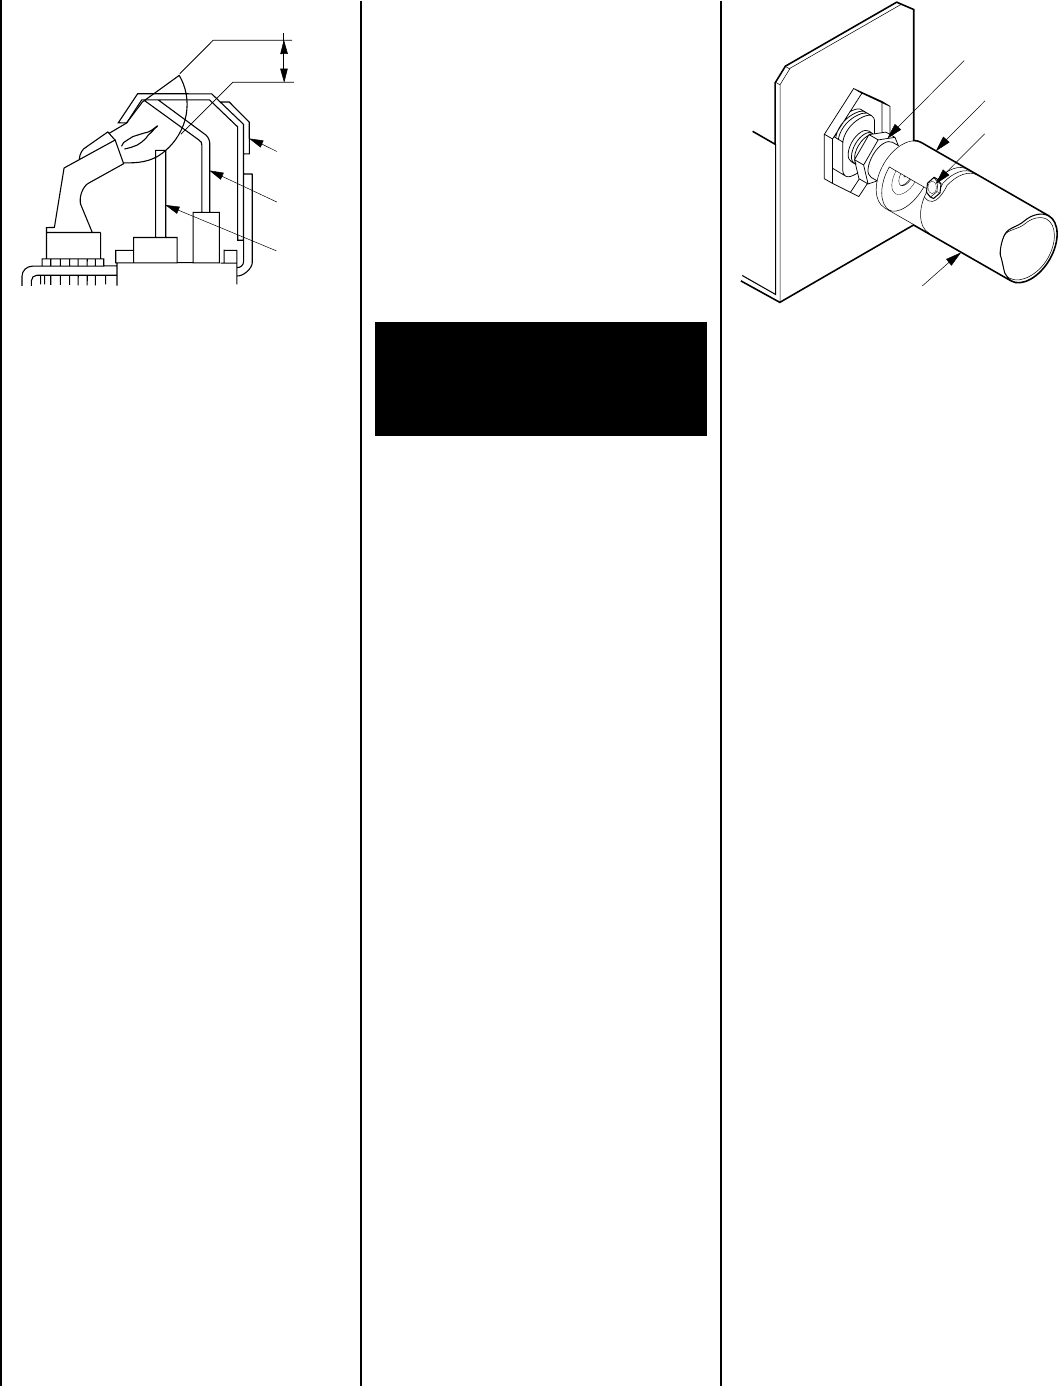
Hot Surface
Igniter
Flame Rod
Ground
Electrode
3/8 To 1/2 Inch
(9 mm to 13 mm)
Step 10. Adjustments – The following para-
graphs address adjustment concerns and
procedures.
Flame Appearance and Sooting
Proper flame appearance is a matter of taste.
Generally most people prefer the warm glow of
a yellow to orange flame. Appliances operated
with air shutter openings that are too large, or
with long vertical vent runs, will exhibit flames
that are blue and transparent. These weak, blue
and transparent flames are termed anemic.
If the air shutter opening is too small sooting
may develop. Sooting is indicated by black
puffs developing at the tips of very long orange
flames. Sooting results in black deposits form-
ing on the logs, appliance inside surfaces and
on exterior surfaces adjacent to the vent termi-
nation. Sooting is caused by incomplete com-
bustion in the flames and a lack of combustion
air entering the air shutter opening.
To achieve a warm yellow to orange flame with
an orange body that does not soot, the shutter
opening must be adjusted between these two
extremes.
No smoke or soot should be present. Reposi-
tion the log set if the flames impinge on any of
them.
If sooting conditions exist, the air shutter
opening on the main burner can be adjusted.
Normally, the more offsets in the vent system,
the greater the need for the air shutter to be
opened further.
WARNING: AIR SHUTTER ADJUSTMENT
SHOULD ONLY BE PERFORMED BY A
QUALIFIED PROFESSIONAL SERVICE
TECHNICIAN.
Orifice
Air Shutter
Burner Tube
Adjusting
Set Screw
Nominal Air Shutter Settings
Natural Gas - 1/16" (1.59 mm) Open
Propane Gas - 1/4" (6.35 mm) Open