


Printed in U.S.A. © 2010 Lennox Hearth Products
P/N 775,253M REV. A 06/2010
Lennox Hearth Products reserves the right to make changes at any time, without notice, in design, materials, specifications, prices and also to discontinue colors, styles and products. Consult
your local distributor for fireplace code information.
Lennox Hearth Products
1508 Elm Hill Pike, Suite 108 • Nashville, TN 37210
4
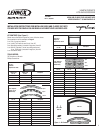
Face Installation
A number of different faces are available for the Ravelle 42 fireplace,
however all the faces are installed in a similar manner. A total of four
screws, two upper and two lower, attach the face to the fireplace. To
install the face:
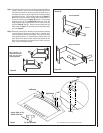
Step 6. Locate the two screws found in the hardware bag shipped with
the face. Position the face (with the lower door open) in front of
the fireplace. Install the two screws shown in Figure 6, through
the holes in the lower door hinge bracket and screw them into the
captive nut on the tab (see Figure 6). Do not fully tighten these
screws yet.
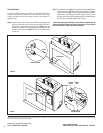
Step 7. The bracket shown in Figure 7 is installed on the face during the face
assembly (see the instructions on the previous page). The captive
screws, shown in Figure 7, on this bracket need to be screwed into
captive nuts on the fireplace as follows; Align the face for plumb
and level, then using a phillips head screwdriver (inserted through
the vent holes in the face), tighten all four screws.
Caution: Any masonry that has been cleaned with an acid wash must be
properly neutralized before installing the fireplace face. The acid wash
will tarnish the face. Consult your masonry installer.
Figure 6
Figure 7
Captive
Nut
Tab
Screw
Two Screws
Bracket
Captive
Screw
Captive
Nut
Expanded View
Expanded View