


2
NOTE: DIAGRAMS AND ILLUSTRATIONS ARE NOT TO SCALE.
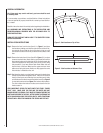
Figure 2 - Stud Locations on Top of Face
Figure 3 - Stud Locations on Bottom of Face
GENERAL INFORMATION
All of these parts may scratch and bend, great care should be used
in handling them.
If you encounter any problems, need clarification of these instructions
or are not qualified to properly install this kit, contact you local distribu-
tor or dealer.
Read this instruction sheet in its entirety before beginning the installation.
ALL WARNINGS AND PRECAUTIONS IN THE INSTALLATION AND
OPERATION MANUAL PROVIDED WITH THE APPLIANCE APPLY TO
THESE INSTRUCTIONS.
TURN OFF THE FIREPLACE AND ALLOW IT TO COMPLETELY COOL
BEFORE PROCEEDING.
INSTALLATION INSTRUCTIONS
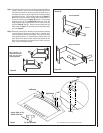
Step 1. Remove the face from the box (item #1 in Figure 1) and place
the face down making sure that the side with the studs are fac-
ing upwards. Be sure that the front of the face is lying on a soft
non-abrasive surface to avoid any scratches to the surface of the
face.
Step 2. Remove the insets from it’s box (item #2 in Figure 1). If you have
chosen a brushed nickel, black nickel or gold insets there will be
blue protective tape on the side that will be directed towards the
front of the appliance or facing away from you as you are doing
this procedure. If you have chosen black insets either side can
face the front of the face. Make sure the upper and lower inset
patterns are facing the same direction so they appear the same
when the face is installed on the unit.
Step 3. Next place the classic or arched insets holes over the studs along
the top and the bottom designated studs. There are six studs on
the top of the face to mount the top inset, and there are 4 studs
on the bottom of the face to mount the bottom inset (See Figure 2
for top stud location and see Figure 3 for bottom stud location).
The nuts to fasten the insets to the face can be found in the box
the face came in.
VERY IMPORTANT: SCREW THE NUTS ONTO THE STUDS “FINGER
TIGHT” ONLY. MAKE SURE THE FACE AND THE INSETS ARE NOT
BOWED BEFORE TIGHTENING. THEY MUST BE STRAIGHT BEFORE THE
INSETS ARE SECURED TO THE FACE. AFTER FINGER TIGHTENING THE
NUTS YOU MAY NOW SNUG THE NUTS SLIGHTLY. OVER-TIGHTENING
THE NUTS WILL RESULT IN DAMAGING THE STUDS AND THE FACE.