


6
FLOOR INSTALLATION
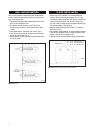
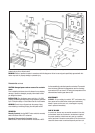
1. Heater may only be installed on a noncombustible flat
surface. Where the flooring is carpeting, tile or of other
combustible material other than wood flooring, maintain the
minimum clearances to the floor as shown in figure 2 or
else use a metal or wood panel (not supplied) extending the
full width and depth of the appliance.
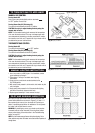
2. Measure heater mounting screw location “X” as desired
above floor. (Fig. 5)
3. Use enclosed “paper template” for proper distance between
holes. Be sure template is level. It maybe necessary to use
plastic or lead anchors for plaster walls.
4. Leave screw head out from wall far enough to attach heater.
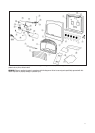
Fig. 5 Optional wall mounting screws for floor installation.
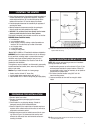
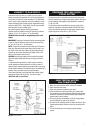
WALL ANCHOR METHOD
Fig. 4 Wall anchor.
When mounting hea
ter to hollow walls (wall areas between
studs) or solid walls (concrete or masonry) it may be neces-
sar
y to use wall anchors.
1. Place paper template on wall maintaining minimum clear-
ance. Be sure template is level.
2. Drill holes at marked locations using 5/16”drill bit.
For solid walls, concrete or masonry, drill holes at least
1”deep.
3. Insert plastic anchor. Tap anchor flush to wall. (Fig. 4)
4. Insert screw into wall anchor leaving screw head out far
enough to attach heater. (Fig. 4)
5. Hang heater on mounting screws in holes provided at the
rear of the heater.
x = 17
3/4
"
45 CM 30,000 BTU/hr units
16
1/2
"
42 CM 18 & 20,000 BTU/hr units
14
1/4
" 36 CM 6 & 10,000 BTU/hr units