


9
5. Remove the discharge valve assembly from the agent cylinder.
Disassemble the siphon tube and remove the spring and discharge
valve stem.
Note: Fire extinguisher valve assemblies are not typically
indexed for orientation with other cylinders, so any time
extinguisher valve assemblies are removed, they should always
be tagged or referenced so they remain matched to the specific
cylinder that they were removed from.
6. Closely examine all components to ensure they are not damaged,
cracked or worn. Remove the O-ring and replace. Re-lubricate o-ring
with a light coat of silicone grease such as Vislox-V711 or equivalent.
7. Examine the valve stem to ensure it is not bent or corroded. Replace
O-ring and re-lubricate with a light coat of silicone grease such as
Vislox-V711 or equivalent.
8. Properly reassemble the discharge valve assembly. Ensure the valve
stem, spring and siphon tube are correctly installed and securely
tightened.
9. Empty the agent cylinder and visually examine it internally
and externally for any damage, thread wear, dents, repairs, corrosion,
discoloration or contaminants. If necessary remove extinguisher
from service and replace.
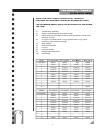
10. Add the proper type and quantity of Kidde dry chemical agent
specified on the extinguisher nameplate recharge instructions.
11. Reinstall the discharge valve assembly onto the agent cylinder. Ensure
the valve is properly snugged down and the pressure gauge is
properly orientated perpendicular to the front of the extinguisher.
WARNING:
Regulated extinguisher pressurization sources should never
be set any higher than 25 PSI (172 kpa) over the intended
extinguisher charge pressure or be left connected to an
extinguisher for extended periods of time. Never stand directly in
extinguisher for extended periods of time. Never stand directly in
front of an extinguisher gauge or stand over the valve assembly
during pressurization.
12. Install the proper Kidde pressurization charge adapter into the
discharge valve outlet port. Using a regulated source of dry nitrogen
containing a calibrated pressure gauge, depress operating lever
and slowly pressurize the extinguisher to pressure indicated on the
nameplate. Reference the calibrated pressurization gauge for proper
charge.
Note: To avoid damaging non-metal siphon tube assemblies,
charge pressure should be applied slowly.