7
discharge nozzle, and/or hose assembly is correct for the model.
(Newer Kidde models indicate this information on their nameplates)
6. Visually examine the cylinder valve discharge port for any signs of
thread wear, corrosion, obstructions or accumulations of any foreign
material.
7. Examine the pressure gauge for the following, properly depressurize
and replace if necessary. (For corrective action refer to the trouble
shooting section in this manual.)
(a) Ensure the gauge pressure needle indicates within the green
operable area.
(b) Visually ensure there is no external gauge damage, deformation,
dents or cracks.
(c) Verify gauge charge pressure properly correlates with charge
pressure on nameplate.
(d) Ensure gauge indicates proper compatibility for dry chemical
extinguishing agent.
(e) Ensure gauge indicates proper compatibility for use with either
aluminum or plated brass valve material.
Note: Recent Kidde Pro extinguisher models feature plated brass
valve body assemblies.
8. Closely examine the carrying handle and operating lever for any
damage or deformation, and ensure the rivets are secure.
9. Being careful not to accidentally discharge the extinguisher, pull
and remove the ring pin breaking the visual inspection seal, to ensure
the ring pin functions freely and is not bent, damaged or corroded.
Re-install proper ring pin through the proper lever and valve ports,
then install a new visual inspection tamper seal through the pull pin
loop and around the carrying handle.
10. Looking under the operating lever ensure the visual portion of the
valve stem shaft is not bent, damaged or corroded. (The top of the
stem should extend from the valve body approximately 1/4 of an inch.)
11. Ensure the extinguisher nameplate is legible and secure. The
nameplate operating instructions should face outward and be
orientated within 30 degrees of the pressure gauge face. Check to
ensure HMIS information is present and legible.
12. Reinstall and secure the discharge nozzle, and/or hose assembly into
the discharge valves outlet port. Adjust and secure the hose nozzle
into the retention band clip (if equipped).
13. Examine the cylinder hose retention band assembly (if equipped) for
any damage and ensure it is properly adjusted to accommodate the
hose assembly nozzle.
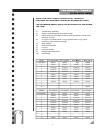
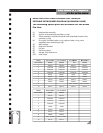
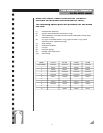
14. Weigh the extinguisher and verify that the total charged extinguisher
weight falls within the tolerance limitations specified on the
nameplate instructions.


