12
Prefabricated Fireplace Installation
A factory-built prefabricated fireplace will require
a few modifications before installation of the
Jøtul GI425 Camden fireplace insert.
Modification Steps:
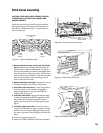
1. Remove any fuel grate or other components
attached attached to the firebox. On most
models the firegrate is attached to the unit
with brackets which should be cut or pried off.
2. Remove the damper assembly. This includes
the damper blade, handle and any linkage.
Two 3” liners must be able to pass through the
damper area.
3. Remove any firescreen or door assembly. This is
usually done by removing a support rod on the
inside of the fireplace frame.
4. If there is a metal ashlip, it too should be
removed to allow the unit to sit flat in the
fireplace. Be sure to reinstall any screws
removed.
IMPORTANT:
BEFORE STARTING THIS INSTALLATION,
MAKE SURE THAT A GAS LINE CAN BE
INSTALLED OR IS INSTALLED TO THE
FIREBOX. THIS SHOULD ONLY BE DONE
BY A QUALIFIED OR LICENSED
PLUMBER OR GAS FITTER.
The GI425 DV Camden gas insert is specifi-
cally designed to be vented using a co-linear
system.
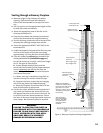
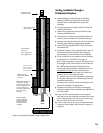
Installation includes a pair of 3” flex ducts
that run from the insert completely through the
existing chimney to the termination cap. See
figure 8.
One liner is attached to the exhaust port on
the back of the unit and will carry the exhaust
gases to the outside of the house. This exhaust
liner must be directly connected to the unit and
run the full length of the chimney.
GAS VENT RULE
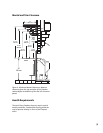
Flat to 6/12 1’0” 0.3M
Over 7/12 to 9/12 2’0” 0.6M
Over 10/12 to 12/12 4’0” 1.2M
Over 13/12 to 16/12 6’0” 1.8M
Over 17/12 to 21/12 8’0” 2.4M
Minimum Height
From Roof
ROOF SLOPE
To avoid cross venting the insert- always label
the flex to be used for the exhaust conduit at both
the top and bottom ends of the flex. This ensures
that the exhaust flex is installed to the proper outlet
on the chimney termination kit.
The minimum vent height above the roof or
adjacent walls is specified by major building codes.
A general guide to follow is the Gas Vent Rule below.
The other 3” liner will be attached to the intake
port on the back of the unit and will provide fresh air
for combustion to the unit. This liner must extend a
minimum of 6’ off the back of the unit and extend
through the damper area of the fireplace and into
the first section of pipe. This liner can also extend
the full length of the chimney and connect to the
termination cap. See figure 10.
IMPORTANT:
If the intake flex does not extend the full length of
the chimney and connect to the unit and the termi-
nation cap - THEN A METAL BLOCK OFF PLATE MUST
BE CONSTRUCTED AND INSTALLED ABOVE THE UNIT
PRIOR TO THE END OF THE INTAKE FLEX (normally at
the damper area).
IMPORTANT NOTICE:
THE USE OF AN EXISTING CHIMNEY AS
AN AIR INTAKE IS NOT COVERED UN-
DER THE ANSI Z21.88-1999-CSA 2.33-
M99 TEST METHODS AND RESULTING
ITS/WHI PRODUCT CERTIFICATION.
THE CODE AUTHORITY HAVING JURIS-
DICTION MUST BE CONSULTED PRIOR
TO PROCEEDING WITH THIS INSTALLA-
TION METHOD.
CANADA REQUIREMENT: Both the Intake and
the Exhaust liners must extend the full
length of the chimney and be securely
connected to both the unit and the termina-
tion kit.
If the fireplace has been modified to accom-
modate installation, use anchors or masonry
nails to attach the metal Fireplace Conver-
sion Notice Plate supplied with this unit to
the back wall of the masonry fireplace
firebox where it will be readily seen should
the insert be removed.


