


2. Determine a suitable location for the Wall Mount Unit.Be sure
to leave at least 10”of clearance above the Wall Mount Unit
(beneath any shelving,for instance) to lift your Roomba in and
out comfortably.Also,leave 10”of clearance below the Wall Mount
Unit to empty Roomba’s Particle Bin while stowed (Figure 13a).
If possible, find a location near enough to an electrical outlet for
the Charger AC Adapter to reach the Wall Mount Unit.
Note:
Roomba fits snugly in the Wall Mount Unit.It may require some
force to lift Roomba out.Be sure to position Roomba in a location
where you have plenty of leverage.
3. Using a pencil,mark the locations of the holes to be drilled on the
wall (Figure 13c).
4. Remove the Wall Mount Unit and drill the five pilot holes in the
wall. Use a 1/4”drill bit to use the included wall anchors (best for
drywall or plaster),or an 1/8”drill bit if using just the included
screws without wall anchors (best for wood).If using the wall
anchors,hammer the wall anchors into the holes until they are
flush with the wall surface (Figure 13d).
5. Affix the Wall Mount Unit to the wall by screwing in the included
screws with a #2 Phillips screwdriver (Figure 14a).
6. Insert the rubber screw hole plugs into the screw holes to finish
installation (Figure 14b).
7. Press the Charger AC Adapter’s cord into the Charge Cord Pincer on
the bottom right side of the Wall Mount Unit as shown,and plug
the Charger AC Adapter into a standard U.S.electrical outlet.
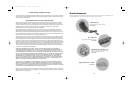
Using the Wall Mount Unit
Roomba may be stored and charged in the Wall Mount Unit as needed
in between floor cleanings.To lift Roomba in and out of the Wall Mount
Unit, firmly grasp Roomba’s handle in one hand and use the other hand
to steady Roomba.Alternatively,you can grasp Roomba securely with
both hands (Figure 16).
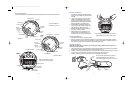
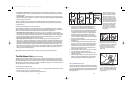
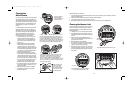
Figure 14a-b (Pro Elite only):Securing
the Wall Mount Unit.Affix the Wall
Mount Unit to the wall by screwing in
the included screws with a #2 Phillips
screwdriver (Figure 14a).Insert the
rubber screw hole plugs into the
screw holes to finish installation
(Figure 14b).
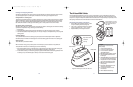
Figure 15 (Pro Elite only): Trap a few
inches of the Charger AC Adapter’s
cord in the Charge Cord Pincer on the
bottom right side of the Wall Mount
Unit for easy charging when Roomba
is stowed away.
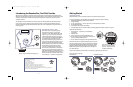
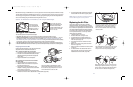
Figure 13a-d (Pro Elite only):
Preparing to mount the Wall
Mount Unit.Hold up the Wall
Mount Unit as shown on the
wall where you want to store
Roomba, leaving enough clear-
ance above and below the Unit
(Figure 13a).Using a pencil,mark
the locations of the holes to
be drilled on the wall (Figure
13c).Remove the Wall Mount
Unit and drill the five pilot
holes in the wall.Hammer the
wall anchors into the holes
(Figure 13d).
10"
10"
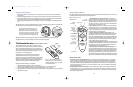
• Keeping tabs on Roomba’s state: The Roomba Remote has all the same buttons as on Roomba Pro | Pro Elite,but
its buttons do not light up as they do on Roomba to help keep you informed of Roomba’s state.Always look at Roomba
to determine it’s state.
• The Pause Button: The red Pause Button on the Roomba Remote may be pressed during any cleaning cycle to Pause
Roomba. This button may be thought of as a “panic button”:it only pauses Roomba.Once Roomba is paused, additional
presses of this button have no effect.
Tip: Can’t find Roomba once it’s finished its work? Point the Roomba Remote in the general direction that you think
Roomba may be hiding.Press the Power Button on the Roomba Remote over and over.If Roomba can “see”the Remote,
it will beep to start up.
Using the Roomba Remote with Roomba Pro
The Roomba Remote is designed for use with Roomba Pro Elite,but is also compatible with Roomba Pro.As an added
benefit for Roomba Pro owners,all of the features of Roomba Pro Elite are available to Roomba Pro users,including MAX
Cleaning mode. However,this feature works slightly differently with Roomba Pro,as described below.
• Starting MAX Cleaning with Roomba Pro: If Roomba Pro is off,turn it on (see Feature #1 in Using the Roomba
Remote on page 13),and press the MAX Button on the Roomba Remote.Roomba will play its “Starting a Cleaning Cycle”
tune and begin a MAX cleaning cycle.Roomba typically lets you know what Cleaning Cycle it’s in by illuminating the cor-
responding Cleaning Cycle Button.Since Roomba Pro does not have a MAX Cleaning Cycle Button,no Cleaning Cycle
Button is illuminated while Roomba Pro is in a MAX Cleaning Cycle.
• Pausing MAX Cleaning with Roomba Pro: Once in MAX Cleaning Cycle,you can pause the cleaning cycle in a
variety of ways — pressing the red Pause Button or any Cleaning Cycle Button on the Remote,picking Roomba Pro up or
pressing any Cleaning Cycle Button on Roomba Pro.When Roomba is paused,it typically lets you know what Cleaning
Cycle is paused by flashing the corresponding Cleaning Cycle Button.Since Roomba Pro does not have a MAX Cleaning
Cycle Button,no Cleaning Cycle Button is flashing while Roomba Pro is paused during a MAX Cleaning Cycle.In this
case,Roomba Pro’s control panel may look a bit confusing. Here’s how to tell that Roomba is paused in a MAX Cleaning
Cycle: If none of the Cleaning Cycle buttons are illuminated,and the Battery Indicator Light is not flashing red,then
Roomba is paused in a MAX Cleaning Cycle.
Beyond these two instances,the Roomba Remote will operate the same way it does with Roomba Pro Elite.
The Wall Mount Unit (Roomba Pro Elite only)
The Wall Mount Unit included with Roomba Pro Elite gives you a convenient,compact storage solution for Roomba.The
Wall Mount Unit easily mounts to a variety of wall surfaces,and is designed to provide easy access to empty the Particle
Bin and charge Roomba while stored.All the hardware needed to mount the unit are included with Roomba Pro Elite.The
Wall Mount Unit fits all Roomba and Roomba Pro models,and is available as an accessory.Visit www.RoombaVac.com for
online purchase options,and for more purchase information.
Installing the Wall Mount Unit
To install the Wall Mount Unit you will need a drill,a 1/4”drill bit or 1/8”drill bit (see below to determine which is best for
your needs),a hammer,a pencil,and a #2 Phillips Screwdriver.
1. Remove all protective packing material from around the Wall Mount Unit.
14
15
Pro Elite Manual MECH.qxd 7/11/03 11:35 AM Page 15