FIELD SERVICE
REPLACEMENT OF THE TRIAC (PN 15475)
26
1. Remove the lower rear panel (Figure 2).
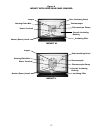
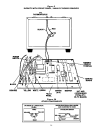
2. Note and record the color and location of each of the three wires on the triac terminals
(Figure 5A). Remove each of the three wires by pulling straight up on the connector. DO NOT
PULL ON THE WIRES.
3. Remove the two nuts and screws that hold triac in place. Lift triac off the rear panel (Figure 5A).
4. There is an insulating pad located between triac and panel. If it did not come off with the triac,
remove it from the rear panel. Do not reuse. Wipe the rear panel to remove any grease-like
materials.
5. Put the new insulating pad and then the new triac in place on the rear panel. Locate the triac
so that the center terminal will face downward when the rear panel is in place.
6. Replace the three wires on the triac terminals (Figure 5A) observing the following color coding:
Yellow wire to upper right terminal.
Blue wire to center (lower) terminal.
Orange wire to upper left terminal.
7. Replace the lower rear panel (Figure 2).


