


4
A
A
A
B
B
B
B
A
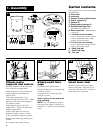
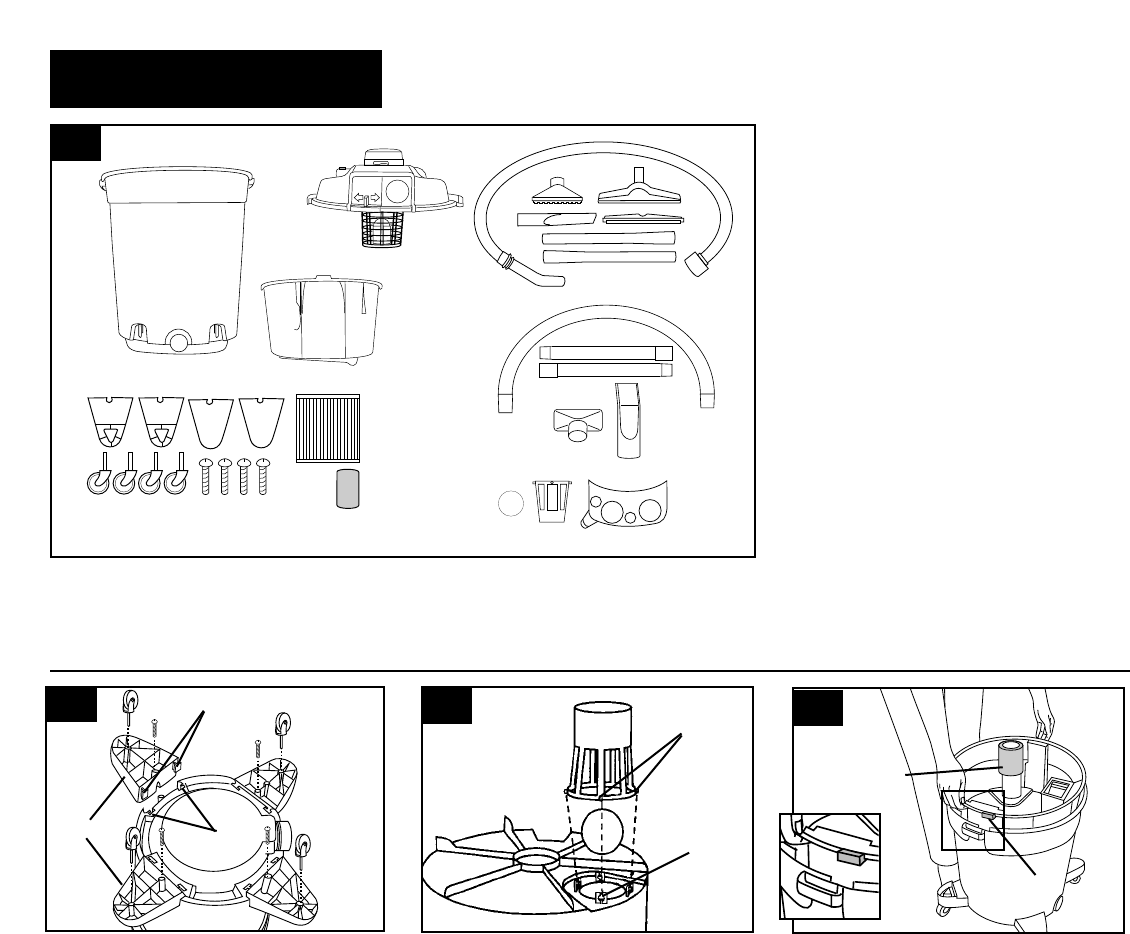
Carton contents
Remove parts from tank and identify
the following:
A. Outer tank
B. Inner tank
C. Cleaner lid and portable blower
D. Caster supports (4)
E. Casters (4)
F. Caster support screws (4)
G. Reusable cartridge filter -
assembled to cleaner lid
H. Small foam filter - assembled to
inner tank
I. 1 1/4-inch tool set includes:
hose, 2 extension wands, wet/dry
nozzle, squeegee insert, utility
nozzle, and crevice tool
J. 2 1/2-inch tool set includes:
hose, 2 extension wands, blower
nozzle, and utility nozzle.
K. Small float ball
L. Small float cage
M. Tool rack
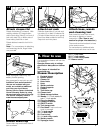
1. Assembly
Attach caster
supports and casters
Remove cleaner lid and inner tank.
Turn outer tank upside down.
Match letters (A or B) on bottom of
caster supports with letters on
cleaner tank.
Then align square tabs (1) on
supports with rails (2) on tank. Slide
tabs onto rails until caster support
(3) snaps in place.
Insert support screw into hole
nearest tank. Tighten screw with a
Phillips screwdriver.
Insert caster stem into hole on
bottom of caster support. Press
firmly until caster snaps into place.
Repeat with remaining casters and
screws.
Turn cleaner tank right side up.
Attach small float
cage
Turn inner tank upside down.
Place float ball over round opening
in bottom of tank.
Snap tabs (A) on float cage into
slots (B) on tank.
Once in place, do not remove the
float assembly.
NOTE: Do not attempt to remove
the large filter cage or float ball on
cleaner lid. They are not removable
parts.
Insert inner tank
With inner tank duct toward drain
side of outer tank, align tab (C) on
inner tank with slot (D) in outer tank;
slide inner tank into place.
1-2
1-3
1-1
3
2
1
A
B
C
D
1-4
A
B
C
D
E
F
G
H
I
J
K
L
M