


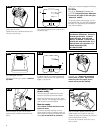


Cleaning carpet
Read “Before you begin cleaning”
instructions.
Fill clean solution tank (upper tank)
according to instructions for Fig. 2-10
through 2-16.
Move speed selector to LO for gentle
cleaning or HI for normal cleaning.
Dry hands and plug cord into a proper-
ly grounded outlet.
Do not clean over floor electrical out-
lets.
To avoid walking on damp carpet, start
at the end of the room farthest from the
door or path to sink where tanks will be
emptied and filled .
Step on handle release pedal and lower
handle to operating position; turn clean-
er ON.
2-27
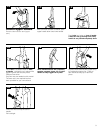
Squeeze trigger to release cleaning
solution and slowly push cleaner for-
ward (equals one wet stroke). Continue
to squeeze trigger and slowly pull
cleaner back toward you (second wet
stroke).
Release trigger and slowly push cleaner
forward over area just sprayed with solu-
tion (dry stroke). Then slowly pull
cleaner back toward you without
squeezing trigger (dry stroke).
Overlap strokes by one inch to help pre-
vent streaking.
Keep nozzle flat on floor for both for-
ward and reverse strokes.
For heavily soiled areas, repeat. To
avoid saturating carpet, do not use
more than 4 wet strokes over one
area. Always end with dry strokes.
It is best to alternate wet and dry
strokes as described above.
For best cleaning results and to aid in
faster drying of carpet, end with more
dry strokes. (Continue using dry strokes
until little water is visible passing
through the recovery tank lid.)
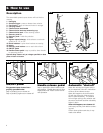
Empty recovery tank when the motor
sound becomes higher pitched and
there is a loss in suction (see Fig. 2-4).
When finished cleaning, follow “After
cleaning” instructions.
8
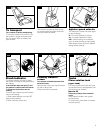
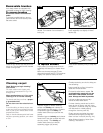
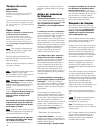
Removable brushes
Your deep cleaner is equipped with
removable brushes for easy cleaning.
To remove brushes
Disconnect cleaner from electrical
outlet.
To prevent possible leaking, remove
clean solution tank and recovery tank.
Set tanks aside.
Press handle release pedal to lower
handle. Turn cleaner over so bottom is
facing up.
Grasp inner portion of brush (A) and pull
brush assembly out slightly to reveal
latches (B).
Press all four latches (B) and pull brush
block out. The brushes can be cleaned
under running water.
To replace brushes
Align posts (C) on both ends of brush
assembly with slots (D) in cleaner hous-
ing.
Make sure that square post (E) also
aligns with square hole (F). Turn brushes
slightly until post fits easily into hole.
Press brush assembly firmly to snap into
place.
2-22
2-24
2-25
2-26
2-23
B
B
B
B
B
C
C
D
D
E
F
B
B
A