


5
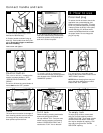
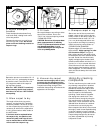
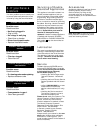
Attach and remove
brushes and pads
Disconnect from electric circuit before
putting on or removing brushes.
Place floor machine upside down on a
flat surface. Press each brush firmly down
over brush shaft (B), rotating brush until a
click indicates that it is in the corre c t
position. To remove grasp center with
thumb and fingers and lift up bru s h .
2-7
2-8
B
To attach pads, insert end of fastener
through opening in pad.
Place pads over power scrub and
cleaning brushes only.
The fastener fits around the brush shaft.
Press fastener to snap pad into place.
Unsnap to remove pad.
2-9
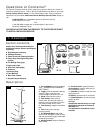
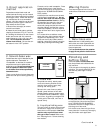
To carry
Use the tank handle to conveniently
carry the floor machine from room to
room.
1. Water method
Linoleum, asphalt, ru b b e r, vinyl, masonry
and stone floors may be cleaned with a
soap or detergent and water solution.
Use floor machine to dispense cleaning
solution, scrub floor, and pick up dirt y
s o l u t i o n .
Do not use the water cleaning method
on wo o d .
1 . Vacuum floor thoroughly to re m o v e
loose dirt and debris.
2. Solvent cleaning
wax method
Wood and other floors may be damaged
by using water solutions; therefore, use
only those cleaners and waxes recom-
mended specifically for these types of
floors.
The following directions are for cleaning
wood or other floors with a cleaning pol-
ishing solvent base liquid wax.
1. Vacuum floor to remove loose dirt and
debris. Wipe up sticky spots with a
damp cloth.
2. Apply wax-cleaner according to man-
ufacturer’s instructions on the container.
Do not dispense wax from tank. Do
not use floor mach i n e to apply sol-
vent base liquid wax to the floor.
3. Refer to “Polishing and buffing floors”.
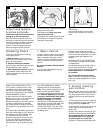
Cleaning floors
There are three methods of cleaning
hard surface floors:
1.Water method - used for all floors
that can be cleaned with soap or deter-
gent and water solution.
2. Solvent cleaning wax method -
used for wood and other floors that may
be damaged by water solutions.
3. Direct application method - used for
polyurethane sealed wood floors and
sealed laminate floors that require peri-
odic restoration.
2 . Attach power scrub and cleaning
b r ushes. If there is a heavy accumulation
of wax to remove, snap heavy duty clean-
ing-waxing pads with fasteners over
b ru s h e s .
3 . Remove tank. Fill with HOOVER Bare
Floor Cleaner as directed on the contain-
e r. Replace tank.
Concentrated ammonia solution must be
used to remove some wax. If using a
p r oduct specifically for wax removal, r e a d
caution label and fo l l ow instructions
on container.
N o t e :The bag in the tank is made of
v i ny l . Check label on detergent container
to be sure that the detergent is not harm-
ful to vinyl.
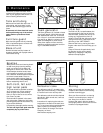
4 . Be sure the control button is in the
“OFF” position. Connect cord to a wall
receptacle. Press handle control lever
with foot and lower the handle. Start by
moving the control button to the “SCRUB-
POLISH-SHAMPOO” position.
5 . S t a rt at the end of a room and apply
solution to a 3 ft. x 6 ft. (1m x 2m) area by
squeezing the trigger occasionally.
Release the trigger and scrub the area as
n e c e s s a r y. When removing hard e n e d
wax, allow solution to remain on the floor
3-5 minutes. Do not let solution dry on the
f l o o r.
6 . To remove the dirty water from the floor,
move the control button to “OFF” then left
and forw a rd to the “WET PICKUP” posi-
tion. Move floor machine over the
s c r ubbed area until the floor is dry. Start
at one end of the floor, scrubbing and
picking up the dirty water as you go. (If
the floor machine is not picking up pro p-
e r l y, check “Maintenance” section
re g a r ding filter bar and squeegee.)
N o t e : It is not always necessary to rinse
floors, because the “WET PICKUP”
removes the detergent solution from the
f l o o r. H ow ev e r, depending on the type
of solution used,the floor may need to
be rinsed thoro u g h ly to eliminate
dulling or streaking. If you prefer to
rinse the floor, empty detergent solution
f r om tank and rinse tank well. Add clear
water through the opening marked
“CLEAN SOLUTION”. Fill to the “ F U L L ”
line. Follow the same pro c e d u re as for
s c r ubbing floors.