


69-0637—2 4
TAB (2)
MOUNTING SLOT (2)
CAPTIVE
MOUNTING SCREWS
THERMOSTAT
BASE
WALLPLATE
OR SUBBASE
35
30
25
20
10
12
11
10
9
8
7
6
5
4
3
2
1
12
1
1
10
9
8
7
6
M8674
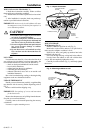
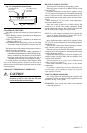
MOUNT THE THERMOSTAT
Note the tabs on the top inside edge of the thermostat
base. These tabs fit the slots molded into the top of the
subbase.
Hang thermostat base on subbase.
Insert the two captive mounting screws located in the
bottom corners of the base (Fig. 6).
Firmly tighten the screws.
Fig. 6—Thermostat mounting.
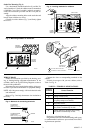
INSERT TIMER BATTERIES
Power is supplied to the timer by two AAA alkaline
batteries (not included).
Install the batteries in the thermostat (Fig. 7).
Once a year or when batteries are dead, replace with two
new AAA alkaline batteries. We recommend Energizer
®
batteries.
Fig. 7—Insert timer batteries.
BATTERY LOCATION FOR
(2) AAA BATTERIES;
INSTALL WITH POSITIVE
ENDS UP
M8585
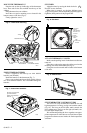
SET TIMER
Adjust the timer by moving the knob clockwise .
Do NOT reverse the knob.
When time is correctly set, the time indicator arrow
(Fig. 8) must point to the corresponding daytime (light) or
nighttime (dark) portion of the program dial.
Fig. 8—Set timer.
TIMER
SETTING
KNOB
TIME
INDICATOR
ARROW
M5161
PROGRAM
PINS (4)
SEE OWNER'S
MANUAL FOR
DETAILS
ATTACH THERMOSTAT COVER
Make sure the packing inserts in the thermostat base are
removed.
Place the two tabs on the upper edge of the cover into the
mounting slots in the thermostat base (Fig. 9).
Swing the cover downward until it catches at the bottom
of the base.
Fig. 9—Attach cover.
SET TEMPERATURE CONTROL LEVERS
The two levers on top of thermostat control the low and
high temperatures for energy savings and comfort control
(Fig. 10). The lever on the left (blue mark) controls the
lower temperature. The lever on the right (red mark) con-
trols the higher temperature.
We recommend pushing the levers together at an appro-
priate temperature for either heat or cool until the occupant
programs the thermostat and makes the final temperature
selections.
50
60
70
80
M8604