


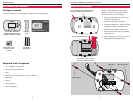


FocusPRO
™
TH6220D Programmable Thermostat
11
Installation Guide
10
1
0
1
2
3
5
6
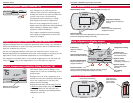
System type
Changeover valve
(O/B terminal)
Fan control
(heating)
Heat cycle rate
(CPH: cycles/hour)
Second stage heat
cycle rate/
Auxiliary heat
(CPH)
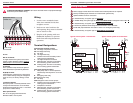
0 Gas, oil or electric heat with air conditioning
1 1 heat/1 cool heat pump
2 Heat only (2-wire systems/power to open & close zone valves/
normally open zone valves)
3 Heat only with fan
4 Cool only
5 2 heat/1 cool heat pump
6 2 heat/2 cool conventional
7 2 heat/1 cool conventional
8 1 heat/2 cool conventional
0 Changeover valve (O/B terminal energized in cooling)
1 Changeover valve (O/B terminal energized in heating)
0 Gas or oil furnace — equipment controls fan in heating
1 Electric furnace — thermostat controls fan in heating
5 For gas or oil furnaces of less than 90% efficiency
1 For steam or gravity systems
3 For hot water systems & furnaces of over 90% efficiency
9 For electric furnaces
[Other cycle rate options: 2, 4, 6, 7, 8, 10, 11 or 12 CPH]
5 For gas or oil furnaces of less than 90% efficiency
1 For steam or gravity systems
3 For hot water systems & furnaces of over 90% efficiency
9 For electric furnaces
[Other cycle rate options: 2, 4, 6, 7, 8, 10, 11 or 12 CPH]
Continued on next page >
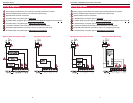
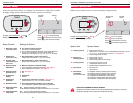
Setup Function Settings & Options
To begin, pr
ess and hold the and
FFAANN
buttons until the display changes
Function
number
Press or to change settings
Press
NNEEXXTT
to advance to next function
Press
DDOONNEE
to exit and save settings
Setting
Installer setup
NextDone
Follow the procedure below to configure the thermostat to match the installed
heating/cooling system, and customize feature operation as desired.
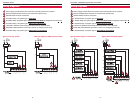
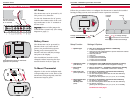
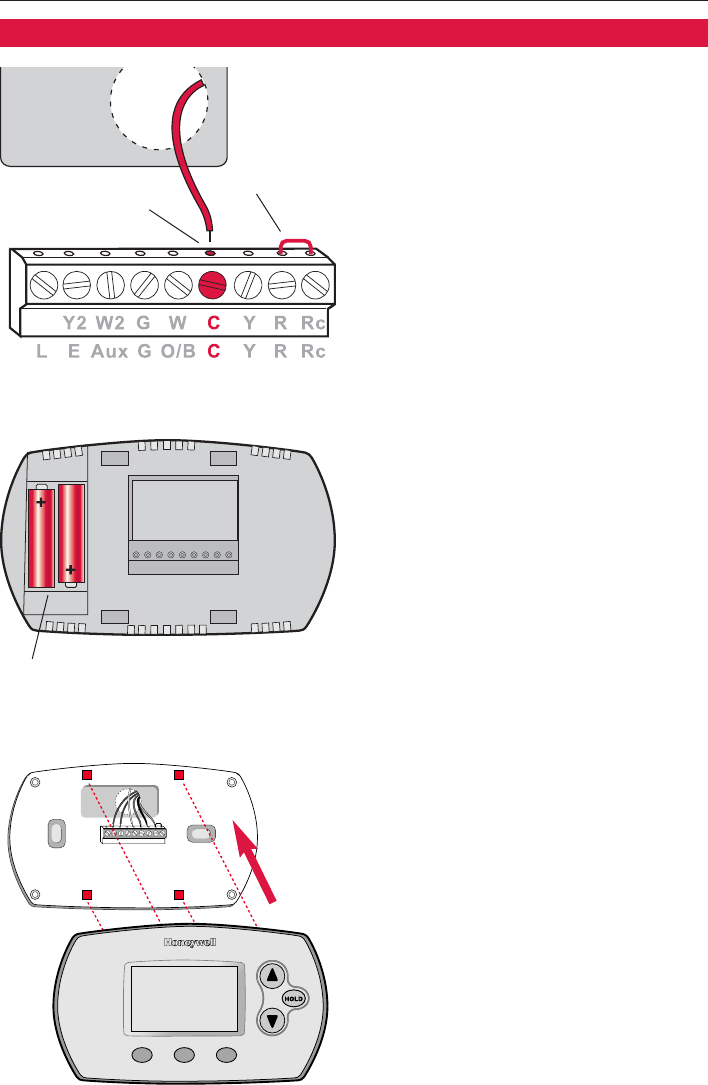
AC Power
The thermostat can be powered by 24
VAC power, or by batteries.
To wire the thermostat for AC power,
connect the common side of the cool-
ing transformer to the “C”terminal as
shown at left.
IImmppoorrttaanntt::
Remove R/Rc jumper for
2-transformer systems only. (See wiring
diagram on page 5.)
Connect common
side of transformer
to “C” terminal
Install batteries in back of thermostat
(optional if AC powered).
Battery Power
The thermostat can be powered by
batteries alone or, if used with AC
power, can provide backup power.
During power interruptions the
batteries will save time/day settings
and power the display.
After installation, batteries can be
changed without removing the ther-
mostat from the wall (see page 15).
To Mount Thermostat
Align the 4 tabs on the wallplate with
corresponding slots on the back of the
thermostat, then push gently until the
thermostat snaps in place.
Jumper
Power options & mounting