


EGPWS LINE MAINTENANCE MANUAL
CAGE CODE: 97896 SCALE: NONE SIZE: A DWG NO.: 060-4199-180 REV: G SHEET 52 of 68
The database may be loaded either while the EGPWC is on the aircraft or on a bench provided the appropriate
power is applied.
Each Honeywell database Service Information Letter includes reference to the procedure for loading the database in
the EGPWC. Refer to the SIL for this information.
4.3 FLIGHT HISTORY DOWNLOADING
In flight, the EGPWC records detected faults, and data prior to and following an alert. This flight history data can be
downloaded from the EGPWC via the PCMCIA interface. With this data, Honeywell can analyze the flight history
when necessary to help in the troubleshooting process, or analyzing special or unique events.
4.3.1 OBTAINING AN EGPWS FLIGHT HISTORY DOWNLOAD CARD
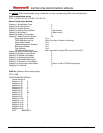
To obtain a Flight History Download (PCMCIA) Card necessary for this procedure, order the following part number:
For MK V and MK VII EGPWS (P/Ns 965-0976-xxx-xxx-xxx/965-1676-xxx/965-1690-xxx and 965-1076-xxx-xxx-
xxx), order Flight History Download Card p/n 718-1592-001.
For MK VI, MK VIII, and MK XXII EGPWS (P/Ns 965-11xx-xxx, 965-12xx-xxx, and 965-159x-xxx), order Flight
History Download Card p/n 718-1593-001.
NOTE: A Honeywell programmed and formatted PCMCIA Card is required to initiate the download sequence and
record the data. The Download Cards (p/n 718-1592-001 and 718-1593-001) are not interchangeable.
Also, database update cards can not be used for flight history downloading.
4.3.2 DOWNLOAD PROCEDURE
1. For the MK VI, MK VIII, and MK XXII access and connect Smart Cable p/n 951-0386-001 to Test Connector J3
on the EGPWC front panel.
For the MK V or MK VII, access and open the front panel door on the EGPWC.
2. Apply power to the EGPWC.
3. Verify that the COMPUTER OK LED is ON.
NOTE: If the COMPUTER FAIL LED is ON, the integrity of the Downloaded Data cannot be assured.
NOTE: If the EXTERNAL FAULT LED is ON, this will not interfere with the Download process.
4. On the EGPWC front panel or Smart Cable (see Figures x-x and x-x), verify the:
• IN PROG LED is extinguished.
• CARD CHNG LED is extinguished.
• XFER COMP LED is extinguished.
• XFER FAIL LED is extinguished.
5. Verify that the PCMCIA Card has its Write Protect Function Selector in the OFF (in- board) position.
NOTE: The PCMCIA Card Write Protect Selector is fragile and should be moved only with the minimum amount
of force.
6. Insert PCMCIA Card into the PCMCIA Card slot.
For the MK V or MK VII, ensure the notch on the bottom of the PCMCIA Card is in the down position. Push the
card in carefully until the PUSH TO EJECT button on the front Panel is fully extended. This will be when the
face of the button is nearly level with the rear of the inserted PCMCIA Card.
For the MK VI, MK VIII, and MK XXII, the label on the card and on the Smart Cable should both be oriented in
the same direction. The PCMCIA Card will only insert about half the card length.
CAUTION: Excessive force will damage the internal connector.
7. While loading is in progress, the IN PROG LED illuminates and the COMPUTER OK LED turns OFF.
8. When loading is complete, the IN PROG LED will turn OFF and the XFER COMP LED will turn ON.