


11
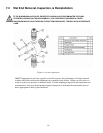
7.2.1 Diaphragm Removal & Reinstallation
1. Adjust the stroke setting to 50% and disconnect the power source to the drive motor.
2. Relieve all pressure from the piping system.
3. Close the inlet and outlet shutoff valves.
4. Place a pan underneath the pump head adaptor to catch any liquid leakage.
5. Disconnect piping to the reagent head and drain any process liquid, following material safety
precautions described.
6. Remove all but one top reagent head bolt. Product will leak out between the pump head adaptor and
reagent head as the bolts are loosened.
7. Tilt the head and pour out any liquids retained by the check valves into a suitable container,
continuing to follow safety precautions as appropriate.
8. Remove the final bolt and rinse or clean the reagent head with an appropriate material.
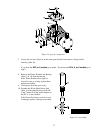
9. Remove the diaphragm by turning it counter-clockwise.
10. Inspect the diaphragm. The diaphragm must be replaced if it is cracked, separated, or obviously
damaged.
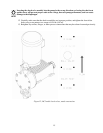
11. Install the diaphragm.
a) Ensure that the critical sealing areas of diaphragm, reagent head, and pump head are clean and
free of debris.
b) Lubricate the elastomer side of the diaphragm liberally, where it is in contact against the pump
head and deflection plate. Use a silicone grease or silicone-based o-ring lubricant.
12. Thread the diaphragm (clockwise) fully onto the shaft.
When reinstalling a used diaphragm it is not necessary to maintain the previous orientation relative to
the reagent head or pump head hole pattern.
13. Install the reagent head bolts and tighten in an alternating pattern to ensure an even seating force.
Torque to the values recommended in Section 6.1.
14. Re-prime the pump following the procedure outlined in Section 6.3.
Take all precautions described under the WARNING on page 9, Section 7 to prevent environmental
damage and exposure of personnel to hazardous materials.