


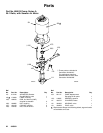

18 308350
Service
Reassembly
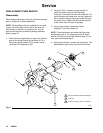
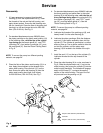
1. If it was necessary to remove the piston ball
housing (9) from the displacement rod (1), clean
the threads of the rod and the ball housing, and
apply thread sealant. Screw the ball housing onto
the rod, hand tight. Place the flats of the piston ball
housing in a vise and torque the rod to 258–285
NSm (190–210 ft-lb). See Fig. 9.
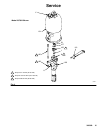
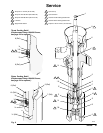
2. For standard displacement pump 236458, place
the piston packings on the piston seat housing (10)
in the following order, with the lips of the v-pack-
ings facing up: the female gland (4*), one PTFE r
v-packing (18*), four leather v-packings (19*), and
the male gland (3*). See the Piston Packing Detail
in Fig. 9.
NOTE: To convert the pump to a different packing
material, see page 24.
3. Place the flats of the piston seat housing (10) in a
vise. Apply thread sealant to the threads of the
piston seat housing. Place the ball (12*) on the
seat. Screw the piston ball housing (9) onto the
piston seat housing hand tight, then torque
to 258–285 NSm (190–210 ft-lb). See Fig. 7.
4. For standard displacement pump 236458, lubricate
the throat packings and place them in the outlet
housing (6) in the following order, with the lips of
the v-packings facing down: the male gland (3*),
four leather v-packings (19*), one PTFErv-pack-
ing (18*), and the female gland (4*). See the
Throat Packing Detail in Fig. 9.
NOTE: To convert the pump to a different packing
material, see page 24.
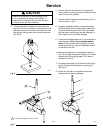
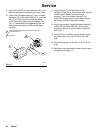
5. Lubricate the threads of the packing nut (8), and
loosely install it in the outlet housing (6).
6. Lubricate the piston packings. Slide the displace-
ment rod (1) and piston assembly down into the
cylinder (2). The cylinder is symmetrical, so either
end may face up. Use a rubber mallet to drive the
rod into the cylinder, until the piston seat
housing (10) is located in the middle of the cylin-
der.
7. Install the seal (11*) on the top of the cylinder (2).
Lubricate the seal and the top threads of the
cylinder.
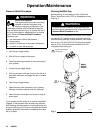
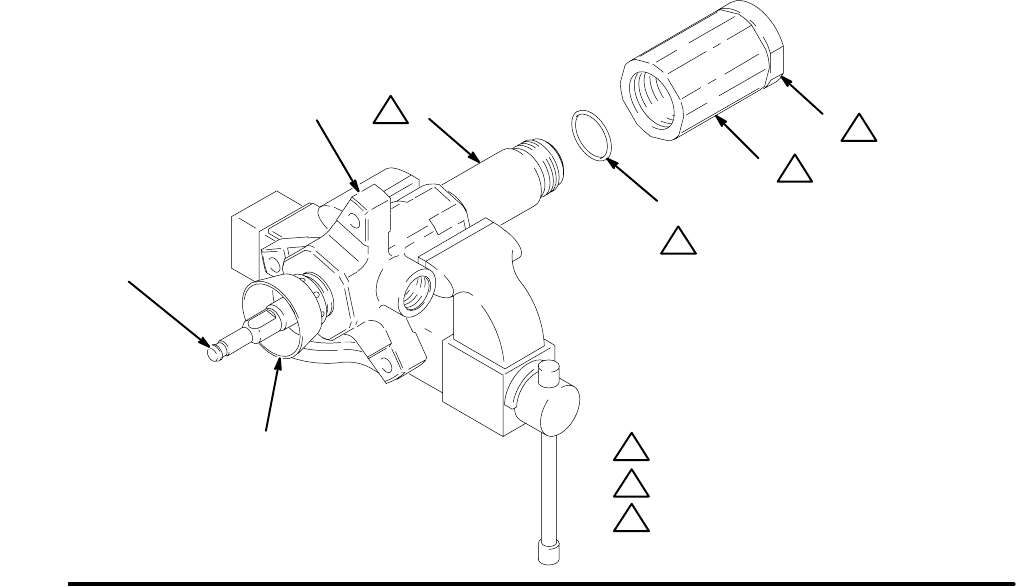
8. Place the outlet housing (6) in a vise, as shown in
Fig. 8. Slide the displacement rod (1) up into the
outlet housing, then screw the cylinder (2) into the
outlet housing handtight. The threads will engage
easily until the seal (11*) contacts the sealing
surface of the outlet housing. The top of the rod
will protrude from the packing nut (8).
05127
Fig. 8
1
8
6
2
7
5
1
1
1
11*
2
2
3
3
Torque to 325–353 NSm (240–260 ft-lb).
Lubricate.
Torque to 190–217 NSm (140–160 ft-lb).