


-3-
598-1125-02
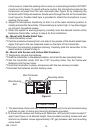
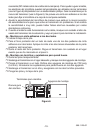
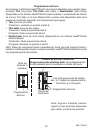
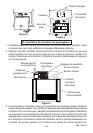
Mounting Holes
Figure 6
Wire Terminals
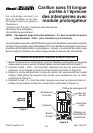
chime case or inside the existing chime case on a resonating chamber (DO NOT
mount on chime bars). To assist with wire routing, the microphone wires can be
temporarily removed from the wire terminals (see Figure 6) by loosening the
terminals with Phillips screwdriver. Route wires through the slot on the transmitter
(see Figure 6). Double-sided tape is provided to attach the microphone to your
existing chime case.
4. Adjust the Microphone Sensitivity so that it is at the least sensitive position to
reliably activate the transmitter. If the sensitivity is set too high, it may false trigger
on common household noises.
5. When the system is working properly, carefully mark the desired location of the
Extension Transmitter, and go to step 6 for final installation.
6a - Mount with Double Sided Tape
❐ Install the battery cover.
❐ Peel the protective backing from one side of two pieces of the double sided tape.
Apply the tape to the two recessed areas on the back of the transmitter.
❐ Remove the remaining protective backing. Carefully stick the transmitter to the
exact location marked in step 5.
6b - Mount with Screws and Hollow-Wall Fasteners
❐ Temporarily remove the batteries.
❐ Hold the transmitter in the desired location, and mark the two mounting holes.
❐ Set the transmitter aside. Drill two 7/32" mounting holes. Tap the hollow-wall
fasteners into the two holes.
❐ Hold the transmitter in place, and secure with the two screws provided.
❐ Reinstall the batteries and the battery cover.
3. Install Chime.
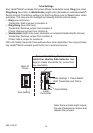
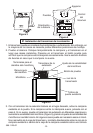
1. The decorative chime unit can stand as a tabletop unit or be wall mounted using
keyholes on rear of chime and mounting hardware provided.
2. To mount with screws and hollow-wall fasteners, drill two pilot holes located 2"
apart (see Figure 4) at desired height. Use provided mounting screws and wall
anchors as needed. Leave approximately 1/8" gap between wall and mounting
screw head.
Wire Routing
Slot