


Heat & Glo • SL-550 / 750 / 950TV-D • 2053-985 Rev. J • 4/0736
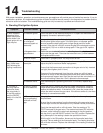
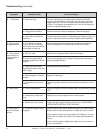
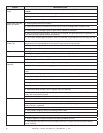
Symptom Possible Cause Corrective Action
3. ...Continued c. Defective valve. Turn the valve knob to the ON position. Place the ON/OFF
switch in the ON position. Check the millivolt meter a the ther-
mopile terminals. The millivolt meter should read greater than
125mV. If the reading is acceptable, and if the burner does not
come on, replace the gas valve.
d. Plugged burner orifi ce. Check the burner orifi ce for stoppage. Remove stoppage.
e. Wall switch or wires are
defective.
Follow the corrective action in Symptom and Possible Cause 1.a
above. Check the switch and wiring. Replace where defective.
4. Frequent pilot
outage problem.
a. Pilot fl ame may be too
high or too low, or blowing
out (high pressure), causing
pilot safety to drop out.
Clean thermocouple and adjust the pilot fl ame for maximum
fl ame impingement. Follow lighting instructions carefully.
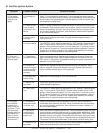
5. The pilot and
main burner ex-
tinguish while in
operation.
a. No LP in tank. Check the LP (propane) tank. Refi ll the fuel tank.
b. Inner vent pipe leaking
exhaust gases back into the
system.
Check venting system for damage. Replace/repair improperly
assembled pipe sections.
c. Glass too loose and air
tight packet leaks in corners
after usage.
Replace glass panel assembly.
d. Bad thermopile or thermo-
couple.
Replace if necessary.
e. Improper vent cap instal-
lation.
Check for proper installation and freedom from debris or block-
age.
6. Glass soots. a. Flame impingement. Adjust the log set so that the fl ame does not excessively impinge
on it.
b. Improper air shutter set-
ting.
Adjust the air shutter located on the control panel.
c. Debris around air shutter. Inspect the opening at the base of the burner. NO MATERIAL
SHOULD BE PLACED IN THIS OPENING.
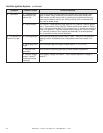
7. Flame burns
blue and lifts off
burner.
a. Insuffi cient oxygen being
supplied.
Ensure that the vent cap is installed properly and free of debris.
Ensure that the vent system joints are tight and have no leaks.
Ensure that no debris has been placed at the base of, or in the
area of the air holes in the center of the base pan beneath the
burner.
Ensure that the glass is tightened properly on the unit, particu-
larly on top corners.
Troubleshooting (continued)