


28
Heat & Glo • GEM36 • 370-900 Rev. O • 2/05
Step 12. Before Lighting the Fireplace
Before lighting the fireplace, be sure to do the following:
Remove all paperwork from underneath the fireplace.
Review safety warnings and cautions
• Read the Safety and Warning Information section at
the beginning of this Installers Guide.
Double-check for gas leaks
• Before lighting the fireplace, double-check the unit for
possible gas leaks.
Double-check vent terminations and front grilles for
obstructions.
• Before lighting the fireplace, double-check the unit for
possible obstructions that could be blocking the vent ter-
minations or the front grilles.
Double-check for faulty components
• Any component that is found to be faulty MUST BE re-
placed with an approved component. Tampering with the
fireplace components is DANGEROUS and voids all war-
ranties.
A small amount of air will be in the gas supply lines. When
first lighting the fireplace, it will take a few minutes for the
lines to purge themselves of this air. Once the purging is
complete, the fireplace will light and will operate normally.
Subsequent lightings of the fireplace will not require this
purging of air from the gas supply lines, unless the gas
valve has been turned to the OFF position, in which
case the air would have to be purged.
NOTE: The fireplace should be run 3 to 4 hours on the initial
start-up. Turn it off and let it cool completely. Remove and
clean the glass. Replace the glass and run the fireplace for
an additional 8 hours. This will help to cure the products
used in the paint and logs.
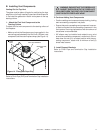
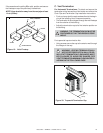
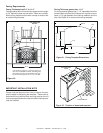
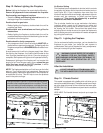
Figure 36.
Air Shutter Setting
This fireplace has an adjustable air shutter (which controls
the primary air) factory set for the minimum vertical vent run
(see Figure 36). If your installation has more than the
minimum required vertical vent length, adjustment of the air
shutter may be necessary to obtain optimal flame
appearance. This should be adjusted by a qualified
installer at the time of installation.
The air shutter handle has a gap maintainer clip factory
installed which needs to be removed to make any
adjustments. By pushing the air shutter handle in, you will
be closing the air shutter. Care should be taken when
adjusting the air shutter so as not to cause the fireplace to
soot. If sooting occurs the air shutter will need to be opened
by pulling the handle out.
!
!
Step 13. Lighting the Fireplace
You’ve reviewed all safety warnings, you’ve checked the
fireplace for gas leaks, you know the vent system is
unobstructed, and you’ve checked for faulty components.
Now you’re ready to light the fireplace.
WARNING: PLEASE REFER TO THE USER’S
MANUAL FOR ALL CAUTIONS, SAFETY,
AND WARNING INFORMATION PERTAINING TO
THE LIGHTING AND OPERATION OF THE
FIREPLACE.
After the Installation
LEAVE THIS INSTALLATION MANUAL WITH
THE APPLIANCE FOR FUTURE REFERENCE.
AIR SHUTTER
HANDLE
GAP MAINTAINER CLIP
During this break-in period it is recommended that some
windows in the house be opened for air circulation. This will
help avoid setting off smoke detectors, and help eliminate
any odors associated with the fireplace’s initial burning.
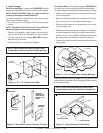
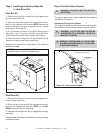
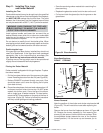
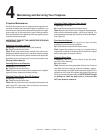
Step 14. Climate Control
This model is equipped with a baffle which will allow you to
control the usable heat output. The baffle control lever is locat-
ed at the lower left corner of the unit behind the lower grille.
MORE HEAT: Pull handle down and push back to close the
damper.
LESS HEAT: Pull handle forward and push up to open the
damper.
Figure 37.
BAFFLE
CONTROL
LEVER