


17Heat & Glo • GEM36 • 370-900 Rev. O • 2/05
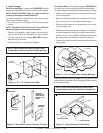
B. Installing Vent Components
Venting Out the Top Vent
The glass must be taken off again for positioning the logs
when the unit is finally installed in place and finished around
it. Re-install the glass door. Attach vent system to the top
starting collars.
1. Attach the First Vent Component to the
Starting Collars
To attach the first vent component to the starting collars of
the fireplace:
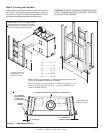
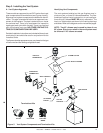
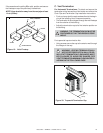
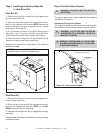
• Make sure that the fiberglass rope ring supplied in the
manual bag seals between the first 8 inch (203mm) vent
component and the outer fireplace wrap (see Figure 14).
Refer to Cinch Pipe (DVP) and Termination Cap installation
instructions.
Figure 14. Fiberglass Rope Ring
FIBERGLASS ROPE
RING
FIRST VENT COMPONENT
OUTER
WRAP
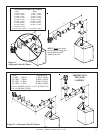
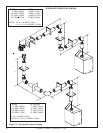
2. Continue Adding Vent Components
• Continue adding vent components snap-locking, locking
each succeeding component into place.
• Ensure that each succeeding vent component is secure-
ly fitted and locked into the preceding component in the
vent system. Securing pipe sections with a maximum of
two screws is recommended.
• 90° elbows may be installed and rotated to any point
around the preceding component’s vertical axis. If an el-
bow does not end up in a locked position with the pre-
ceding component, attach with a minimum of two (2)
sheet metal screws.
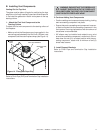
3. Install Support Brackets
Refer to Cinch Pipe and Termination Cap installation
instructions.
!
WARNING: ENSURE THAT THE FIBERGLASS
GASKET SUPPLIED WITH THE FIREPLACE
SEALS BETWEEN THE FIRST VENT COMPONENT
AND THE OUTER FIREPLACE WRAP.