


August 1, 2008
Page 15
Heat & Glo · Tiara I B & Tiara II B · 7010-149M
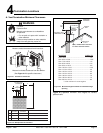
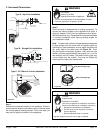
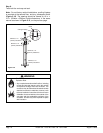
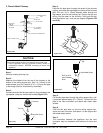
Step 5.
Place the wall thimble cover over the pipe assembly and
slide the appliance and vent assembly towards the wall,
carefully inserting the vent pipe into the vent termination
cap assembly. It is important that the vent pipe extend into
the vent termination cap a sufficient distance so as to result
in a minimum pipe overlap of 1-1/4 in. (32mm). Secure the
connection between the vent pipe and the vent termination
cap by attaching the two sheet metal strips extending from
the vent termination cap assembly into the outer wall of
the vent pipe. Use the two sheet metal screws provided to
connect the strips to the pipe section (Figure 5.9).
Fold Strap
Here
Wall Thimble Cover/Ceiling
Firestop as Required by Local
Jurisdiction
1/4 in. (6mm)
Strap
Sheet Metal Screw
Wall Thimble
Figure 5.9
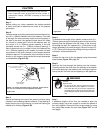
Burn Risk.
• Local codes may require installation of a cap
shield to prevent anything or anyone from
touching the hot cap.
WARNING
WARNING
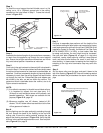
Do NOT connect a pipe section to a termination cap without
using the telescoping fl ue section found on the termination cap.
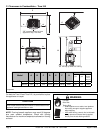
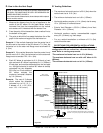
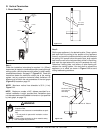
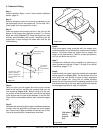
WALL THIMBLE COVER
WALL THIMBLE
Vinyl siding standoff with siding beneath
removed
SCREWS
Bolt horizontal top to vinyl
standoff
SCREWS
Apply sealant to all four sides
VINYL SIDING
Figure 5.8
Fire Hazard.
Exhaust Fume Risk.
Impaired Performance of Appliance.
WARNING
• Ensure vent components are locked together correctly.
• Pipe may separate if not properly joined.
Note: The attachment from the vent pipe to the vent
termination cap must be sealed with silicone. Termination
caps shall not be recessed into a wall or siding.