


Hearth & Home Technologies - Colville
1445 North Highway, Colville, WA 99114-2124
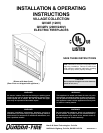
VILLAGE COLLECTION ELECTRIC FIREPLACE
09/03
6
4030-240 Rev F
WARNING - RISK OF FIRE!
The power cord must not be pinched or against a sharp
edge. Secure cord to avoid tripping or snagging to
reduce the risk of fire, electric shock or personal in-
jury.
Do not run cord under carpeting. Do not cover cord
with throw rugs, runners or the like. Arrange cord away
from traffic areas and where it will not be tripped over.
WARNING - RISK OF FIRE!
To prevent a possible fire, do not block air intake or
exhaust in any manner. Do not use on soft surfaces
(like a bed) where openings may become blocked.
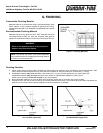
E. INSTALLATION
Select a suitable location that is not susceptible to moisture and is away from drapes, furniture and high traffic areas.
If installing the appliance on/over carpeting, the appliance must be installed on a wood or metal panel extending the full width
and depth of the appliance.
CAUTION:
When transporting or storing this appliance and cord,
keep in a dry place that is free from excessive vibration.
Store so as to avoid damage.
1. Wall Cabinet Kit, Corner Cabinet Kit or Custom Cabinet Installation
*If the power cord is to be used, the Cabinet must provide access to the wall outlet.*
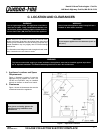
a. For ease of electrical hookup, you may wish to install the appliance near an existing outlet. A 15 amp, 120 volt circuit is
required. A dedicated circuit is preferred but not essential in all cases. A dedicated circuit will be required if, after installation,
the circuit trips or fuse blows on a regular basis while the appliance is operating. Additional appliances on the same circuit
may exceed the current rating of the circuit breaker.
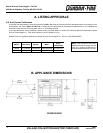
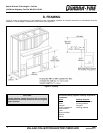
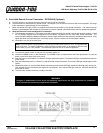
b. If using a listed wall cabinet or corner cabinet, refer to the installation instructions supplied with the kit. For custom cabinets,
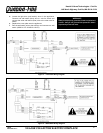
frame and construct with the opening and depth dimensions listed in Figures 1 and 2.
c. Before plugging the appliance into the wall outlet, make sure all control switches are in the OFF position. Open the lower
grille panel to gain access to the controls.
d. Before finishing the cabinet, the appliance must be set into the cabinet and the power cord routed to the electrical outlet. If the
power cord is not being used, refer to Section F. Wiring for hard wiring instructions. If the power cord does not reach the
outlet, a No. 16-AWG minimum wire size extension cord rated for a minimum of 1875 watts may be used.
e. To complete the appliance installation, refer to Section H. Final Installation.
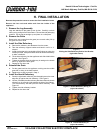
2. Non-Cabinet or Chase Installation
a. Follow recommended framing dimensions in Figures 1 and 2.
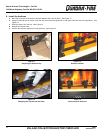
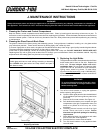
b. Set the appliance into the framed opening. Secure the appliance in place by bending out the two nailing flanges on both sides
of the appliance and nail to the framing. The nailing flanges have been positioned 5/8 back from the front of the appliance to
allow for the addition of drywall.
c. Wiring instructions for 120/208/240V can be found in Section F. Wiring. The power cord must be removed and appliance be
hardwired in all non-cabinet or chase installations. Use recommended power supply wire size in accordance to national and
local codes. It is recommended to have the appliance on a dedicated service.
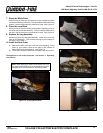
d. Remove the protective cover before finishing the front of the appliance. To finish out the appliance, follow the instructions
found in Section G. Finishing.
e. To complete appliance installation, see Section H. Final Installation.
Note: Follow all national and local electrical codes.