


Heatilator • Eclipse • 4049-229 Rev F • 11/08 47
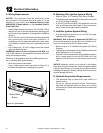
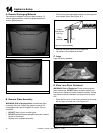
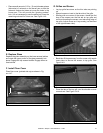
Figure 14.6 Placement of Rockwool
• Place a small amount of 1/2 in. (13 mm) diameter pieces
(dime-size) of rockwool on the burner pan so that the
rockwool touches but does not cover the holes in the
burner pan. This will provide the “glowing embers”
look. It is not necessary to use the entire bag. Save the
remaining rockwool for future use. See Figure 14.6.
E. Replace Glass
Replace the glass assembly on the lower access latches
and rotate the upper portion of the glass assembly into
place. Engage the top access latches. Engage lower ac-
cess latches.
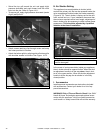
F. Install Floor Cover
Place fl oor cover (painted side up) as shown in Fig-
ure 14.7.
G. Grilles and Screen
• Lay top grille face down so the thin tabs are pointing
up.
• Spread screen out next to the tab side of the grille.
• Starting with one corner of the screen, thread the fi rst
loop of the screen over the fi rst tab on top grille and
continue threading the screen over tabs along edge of
top grille. Adjust screen so it lays evenly (not bunched
or too tight between tabs).
Figure 14.7 Place Floor Cover
Tab
Figure 14.8 Lay Out Screen
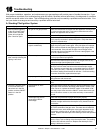
• Bend tabs 90 degrees away from the screen with needle
nose pliers to secure the screen to top grille. See
Figure 14.9.
Figure 14.9 Bend Tabs to Hold Screen
• Place the tabs of the top grill over the shoulder screws
on each end. See Figure 14.10.
Figure 14.10 Attach Top Grill - Left Side Shown