


HearthStone Quality Home Heating Products Inc ® Tribute Model 8040
20
If your glass is remaining dirty, your operating
temperatures are low; therefore, there is a higher risk of
creosote buildup.
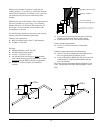
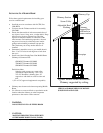
The venting system must be inspected at the stove
connection and at the chimney top. Cooler surfaces tend to
build creosote deposits quicker, so it is important to check
the chimney at the top (where it is coolest) as well as from
the bottom near the stove.
Accumulated creosote should be removed with a cleaning
brush specifically designed for the type of chimney in use.
A certified chimney sweep should be used to perform this
service. Contact your dealer for the name of a certified
chimney sweep in your area (your dealer may be a certified
sweep!).
It is also recommended that before each heating season the
entire system be professionally inspected, cleaned and
repaired, if necessary.
CAST IRON
Exterior cast iron parts are either painted with black, high-
temperature stove paint or porcelainized with an enamel
finish in various colors.
Use black, high-temperature stove paint (satin black by
Stovebright) to touch up and maintain the original
appearance of painted cast iron. Use a damp sponge to
wipe clean. Dry the cast iron thoroughly to prevent rusting.
Enamel castings can be cleaned with a standard glass
cleaner. With time and use, a very fine, subtle network of
crazed lines may appear seemingly beneath the surface of
the enamel. Crazing is a natural predictable process and
does not represent a flaw.
STONE
Occasional cleaning is all that should be necessary to
maintain the natural beauty of your stove’s polished
soapstone finish. Clean the soapstone with water, any non-
abrasive cleaner and a soft cloth. Wipe dust from the stone
with a clean cloth. Do not use chemical agents to wash the
stone; do not use waxes or any polishing agents on the
stone.
Care must be taken not to scratch or chip the stone. Do not
set items, which can scratch or chip the stone (or enamel
finish), on top of your stove.
Often, with use and over time, subtle earth tones of brown,
red, and yellow appear on the soapstone. This is a natural
reaction in the soapstone. Surface or hairline fractures may
appear in the stone after a stove has been used. Such
changes are normal and do not affect the operation or the
integrity of the stove and do not require replacement. If you
observe a completely broken stone, contact your dealer for
service.
GASKETS
Gasket material should normally be replaced every two to
three seasons, depending on stove use. If the door seal is
loose, a new gasket will assure a tight seal and improved
stove performance. Contact your dealer for a gasket kit that
includes instructions and gaskets for your stove.
The procedure for replacing gaskets on the glass is
reviewed on page 20.
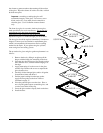
To replace door gaskets, first remove the old gaskets with a
utility or putty knife. Clean all gasket channels with a wire
brush. Apply gasket cement to the channels and push the
new gasket into place without stretching the gasket
material. The door should be shut immediately to fully
press the gasket into place and assure a positive seal.
We require the use of the following gaskets:
DOOR: 67" (170 cm) Length, 3/8" (9.5 mm) Diameter,
Adhesive Black Tube
GLASS: 58" (140 cm) Length, 1/4" (.64 cm) Diameter,
Low Density Black Tube
GLASS
Do not operate the stove with a broken door glass. Do not
abuse the front door by striking or slamming.
When necessary, the glass can be cleaned with low alkaline
content commercial stove glass cleaners, which are
available from your local dealer. Never attempt to clean the
glass while the fire is burning or the glass is hot. Most
deposits can be cleaned by following the instructions
provided with the cleaner. To clean heavier deposits, open
the door and lift it straight up and off the stove with the
hinge pins remaining in the door (take care to save hinge
pins and washers for reuse). Lay the door face down on a
workbench or table, with the handle hanging off the edge so
it will lay flat. Apply the cleaner to the glass and allow it to
set for a few minutes. By laying the door flat, it will allow