


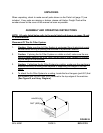


CLEANING AND MAINTENANCE
1. Caution: Always disconnect the Air Filter System from its electrical supply
source before performing any cleaning, servicing, or maintenance.
2. Before each use, inspect the general condition of the Air Filter System. Check
for loose screws, misalignment, binding of moving parts, broken parts, loose or
damaged electrical power cord, and any other condition that may affect its safe
operation. If abnormal noise or vibration occurs, disconnect the Air Filter System
from its electrical supply source immediately and have the problem corrected
before further use.
Do not use damaged equipment.
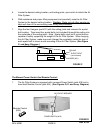
3. Periodically, inspect the Filter Net (part #1) for dirt and debris and, if necessary,
remove and change the Filter Net. The Filter Net is located at the rear of the Air
Filter System unit. To remove the Filter Net, unlock the two Clips located on the
rear/top and bottom panels of the unit. Then, remove the Filter Net to inspect its
condition. Then, replace the old (or new) Filter Net in the rear of the unit and lock
it back in place with the two Clips. (See Figure H.)
FILTER NET (#1)
CLIP
AIR FILTER SYSTEM
(REAR VIEW)
CLIP
FIGURE H
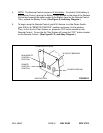
4. Periodically, inspect the Filter Bag (part #2) for dirt and debris and, if necessary,
remove and clean the Filter Bag. The Filter Bag is located at the rear of the Air
Filter System unit. To remove the Filter Bag, unlock the two Clips located on the
rear/top and bottom panels of the unit. Remove the Filter Net (part #1). Then,
remove the Filter Bag to inspect its condition. If necessary, use compressed air
to blow the dirt and debris from the Filter Bag. Caution: During this procedure,
make sure to wear ANSI approved safety impact glasses, ANSI approved hearing
protection, and ANSI approved dust protection. ANSI approved safety impact
glasses, ANSI approved hearing protection, and ANSI approved dust protection
are available from Harbor Freight Tools. Then, replace the Filter Bag and Filter
Net in the rear of the unit and lock them back in place with the two Clips. (See
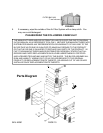
Figures H, I, and Assy. Diagram.)
SKU 46361 PAGE 9